Clay Pot Christmas Crafts: 16 Cheap Terracotta Ideas That Turn Into Snowmen, Trees and Giant Mugs
Clay pot Christmas crafts are having a big moment, and once you see a plain terracotta pot turn into a jolly snowman, you will understand why. Those humble orange pots cost a dollar or two at any garden center, and with a little paint, felt and ribbon they become porch snowmen, giant cocoa mugs, tiny elves and shiny tree bells. One video showing a simple plastic planter turned into Christmas decor passed 1.3 million views in just three weeks, and crafters everywhere are joining in. The best part is that these projects feel cozy to make on a winter evening and look far more expensive than they are. Below are 16 cheap terracotta ideas for the front step, the mantel, the tree and the neighbors. Grab a stack of pots and let the fun begin..
Clay Pot Christmas Crafts for the Front Step
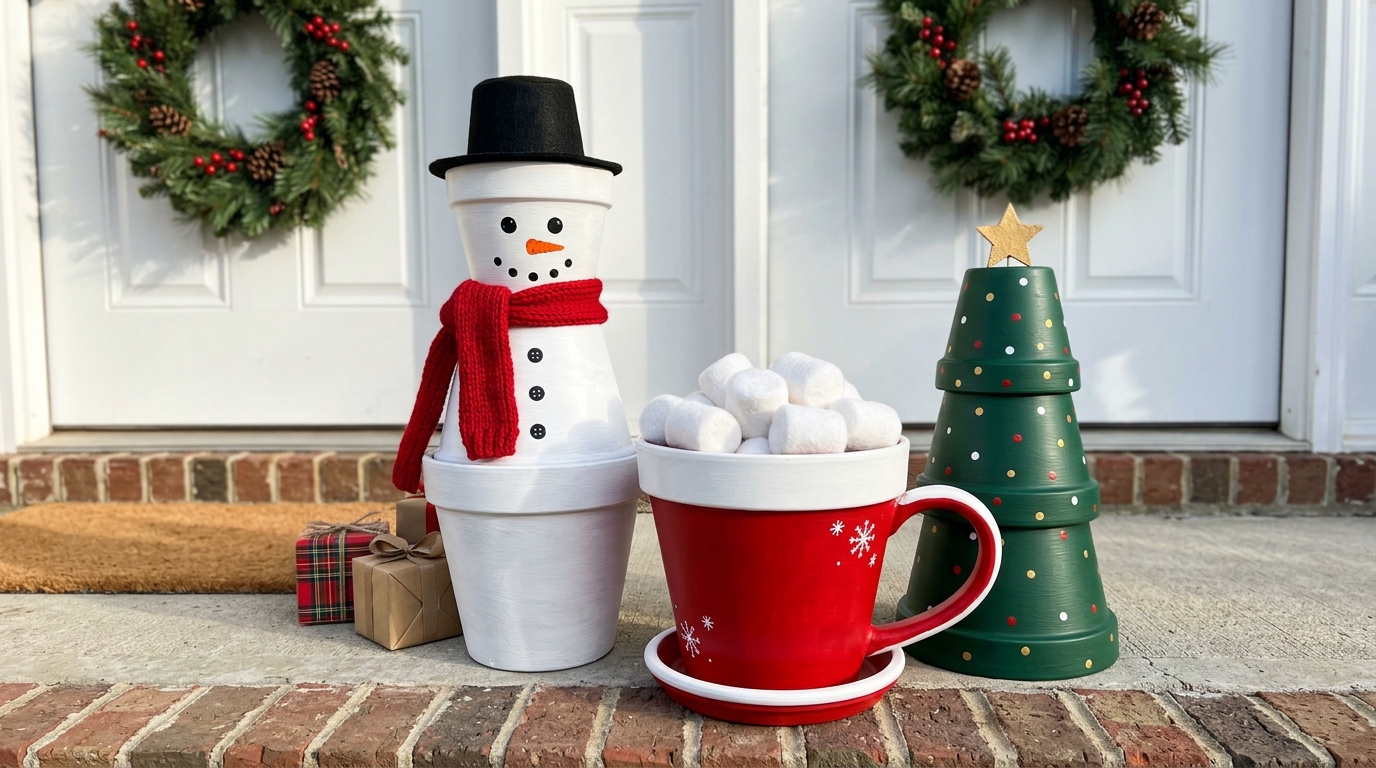
Imagine coming home to this happy little crew waiting by the door: a stacked pot snowman in a red scarf, a giant cocoa mug piled with marshmallows and a dotted green tree with a gold star. Clay pot Christmas crafts like these turn a plain front step into a welcome that makes neighbors smile, and the whole trio costs less than one store bought porch figure. Start with this set, then add more pieces from the ideas below as the season goes on. Which of the three would you make first?..
You will need: Terracotta pots in three or four sizes, saucers, outdoor acrylic paint in white, red and green, a red knit scarf, black felt, felt or foam marshmallows, a wooden star, outdoor sealer, strong craft glue.
How to make it: 1. Wash and dry the pots, then paint each one with two coats and let it dry overnight. 2. Stack and glue the snowman and tree, and add the mug handle with a saucer. 3. Seal everything with outdoor sealer and add the scarf, hat and marshmallows last.
Giant Porch Snowman From Stacked Pots
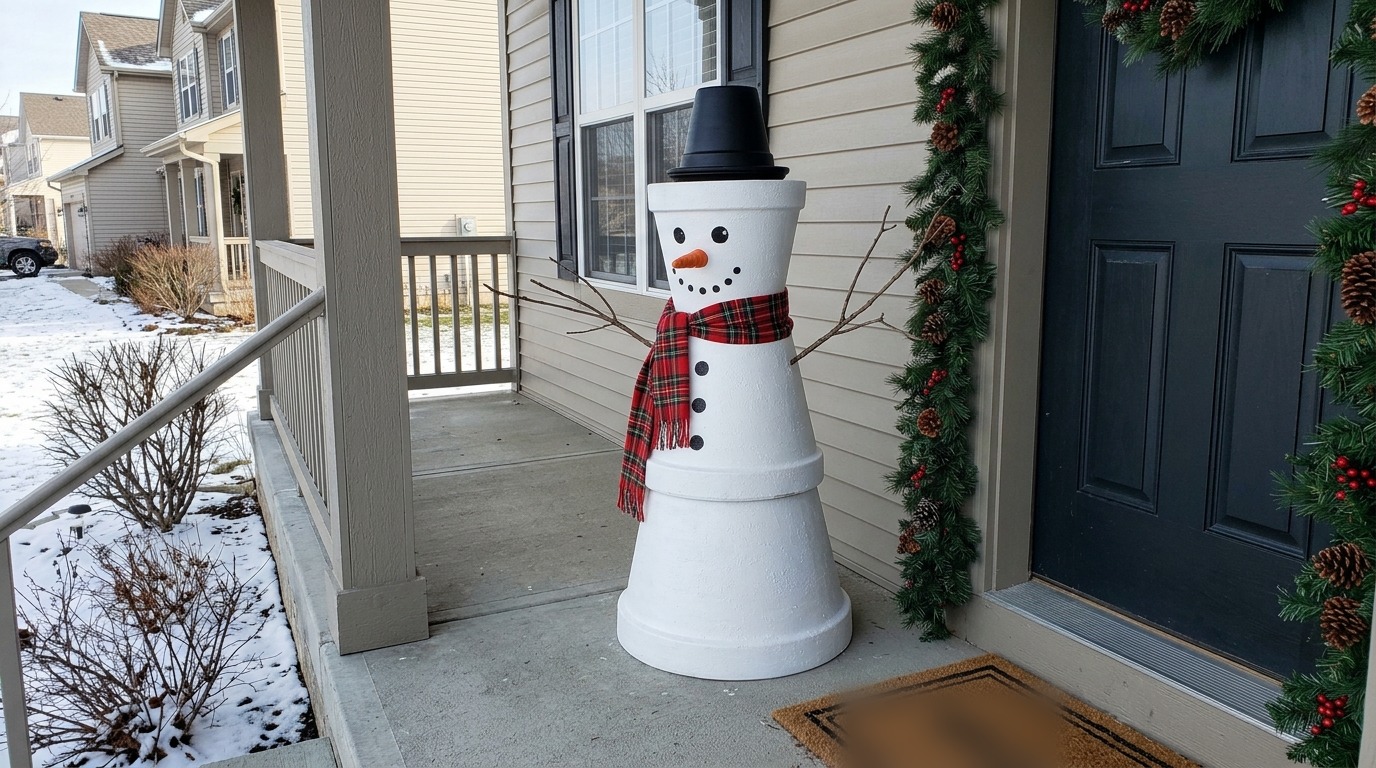
A tall porch snowman is the star of the terracotta trend, and it is easier than it looks. Three big pots flipped upside down and stacked from large to small make the body, and a small pot with a saucer becomes the top hat. Paint everything crisp white, add coal button eyes, a carrot nose and twig arms, then tie on an old flannel scarf. For more ideas like this, browse our cheerful snowman decor ideas. Want to see the build in motion? Watch a quick clay pot snowman video. Would yours wear plaid or a knit?
You will need: Three large terracotta pots, one small pot and saucer, white and black outdoor paint, orange paint or a felt nose, two twigs, a flannel scarf, outdoor sealer, strong glue (adult help).
How to make it: 1. Paint all pots white and the small hat pot black, two coats each. 2. Stack the large pots upside down and glue them, adding a dowel through the holes for strength. 3. Add the face, buttons, twig arms and scarf, then seal.
Giant Hot Cocoa Mug Pot
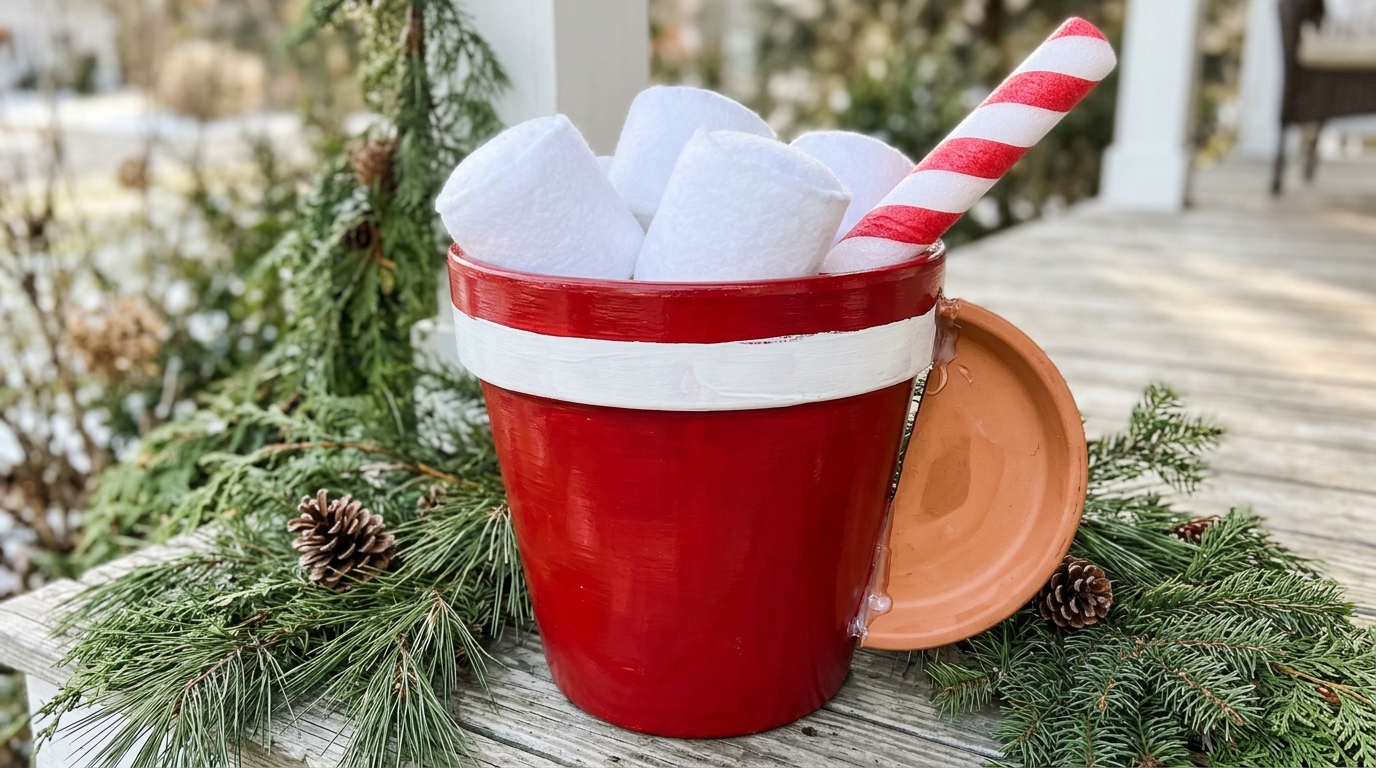
This one makes people laugh every time they walk by. A big terracotta pot painted glossy red with a white rim becomes a giant mug of hot cocoa, and a saucer cut in half or glued on its side turns into the handle. Fill the top with big felt marshmallows and stick in a striped peppermint stick made from a painted dowel. A version on YouTube in the giant mug short drew 34,000 views in two weeks, and it is easy to see why. What color would your giant mug be?
You will need: One large terracotta pot, a saucer, red and white outdoor paint, white felt and stuffing for marshmallows, a dowel, red and white paint for the peppermint stick, strong glue (adult help), sealer.
How to make it: 1. Paint the pot red with a white band at the top and seal it. 2. Glue the saucer to the side as the handle and let it set overnight. 3. Fill the top with stuffing, add felt marshmallows and the striped dowel.
Upside Down Pot Santa

Santa is the easiest character to make from a pot because the shape already looks like his round little body. Flip a pot upside down, paint it red, then add a band of white faux fur along the bottom and a painted rosy face near the top. A fluffy white yarn beard and a tiny felt hat with a pompom finish him off. Make one for the mantel or a whole row in different sizes for a family of Santas. Who in your house would love one on their shelf?
You will need: One small or medium terracotta pot, red, skin tone and pink paint, white faux fur trim, white yarn, red felt, a white pompom, craft glue.
How to make it: 1. Paint the pot red and leave a round face area near the top in skin tone. 2. Glue faux fur around the rim and a yarn beard under the face. 3. Sew or glue a small felt hat and top it with a pompom.
Clay Pot Christmas Crafts: Stacked Pot Tree
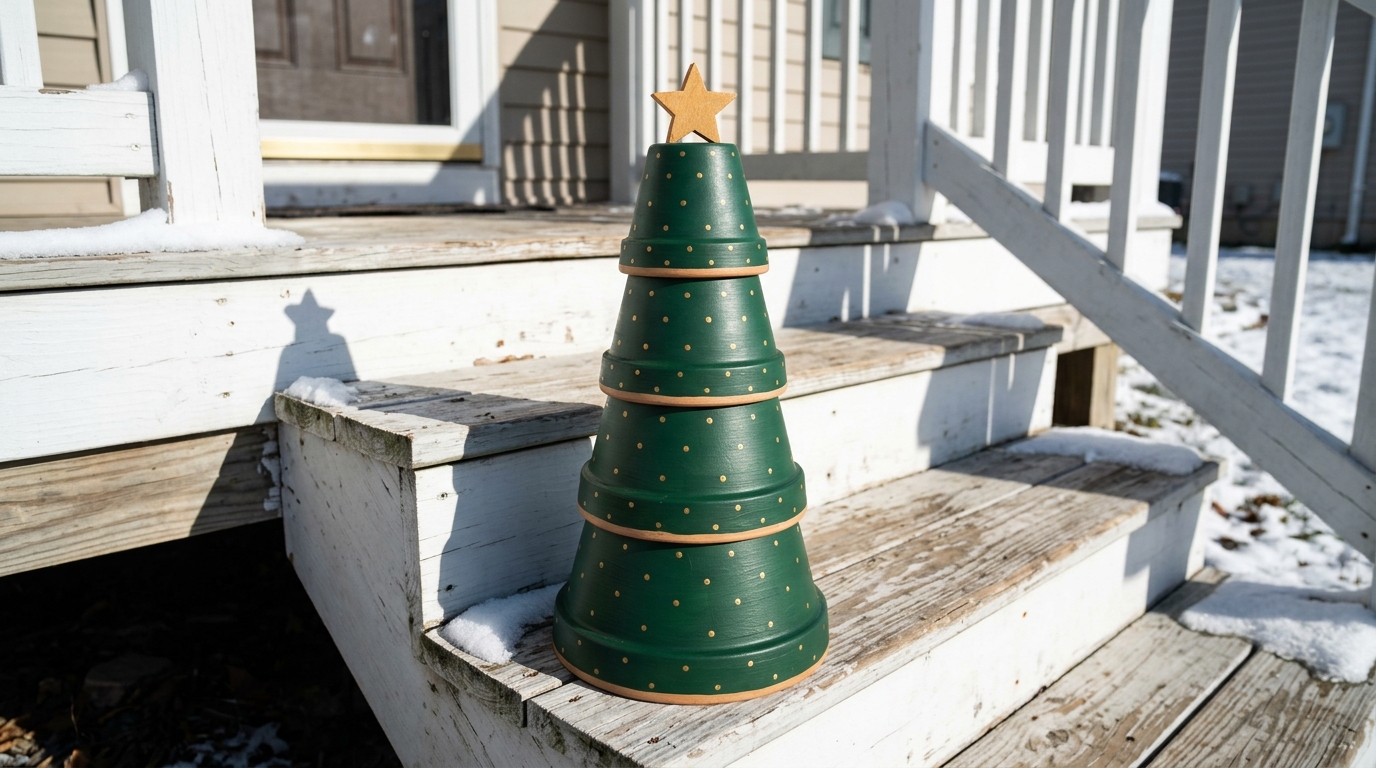
A stacked pot Christmas tree is one of the most popular clay pot Christmas crafts, and you can make it in an afternoon. Flip five pots upside down and stack them from biggest to smallest, then paint the whole tower deep forest green. Tiny gold dots made with the end of a paintbrush look just like ornaments, and a little wooden star on top finishes the look. Make a pair for each side of the door. How tall would you go?
You will need: Five terracotta pots in graduated sizes, deep green and gold outdoor paint, a small wooden star, a dowel, strong glue (adult help), outdoor sealer.
How to make it: 1. Paint each pot green, two coats, and let them dry. 2. Thread them onto a dowel from large to small and glue them together. 3. Dot on gold ornaments with a brush handle, glue the star on top and seal.
Clay Pot Gingerbread House
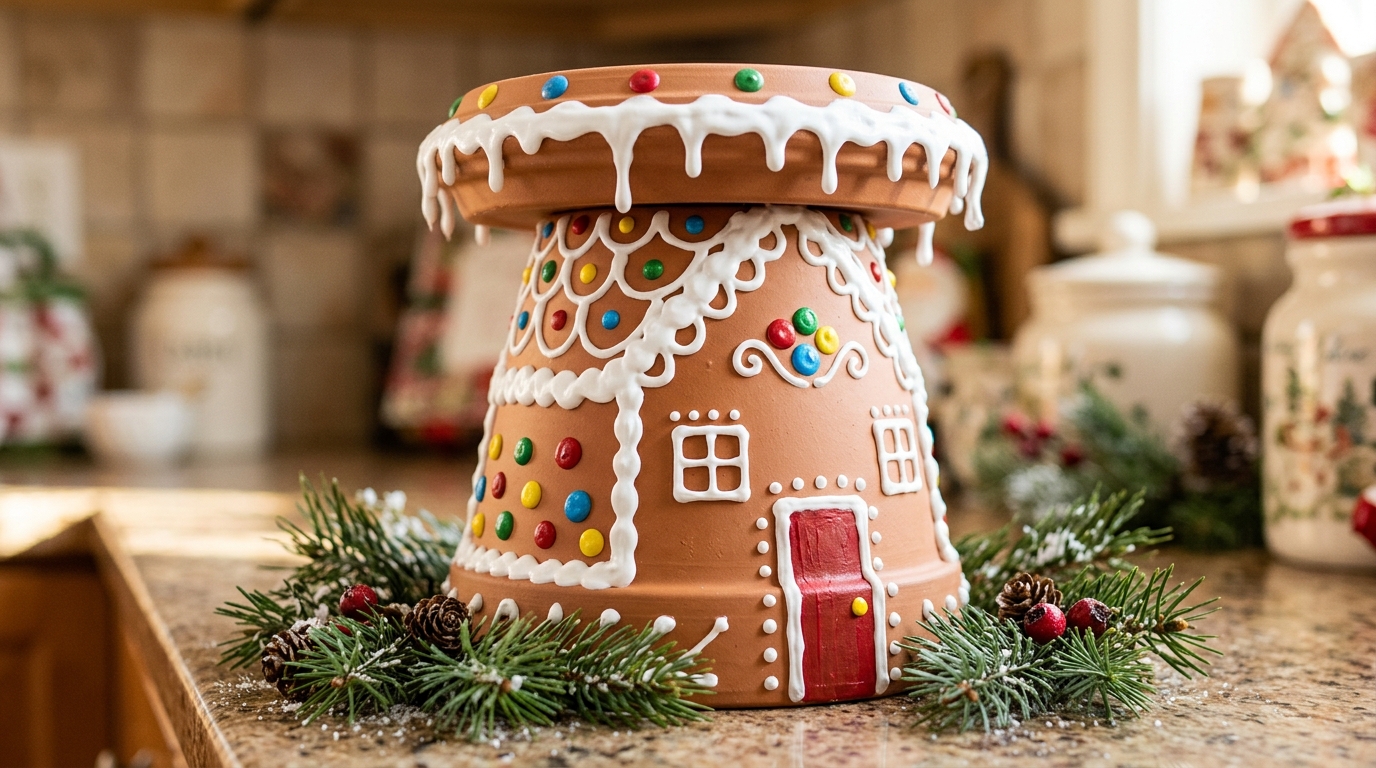
Leave the pot in its natural warm brown and it already looks like a gingerbread cookie. Flip it over, pipe white puffy paint along the edges like icing, and paint a little door, windows and candy buttons. A saucer on top becomes the roof, with drippy white icing lines around the rim. This is a sweet kitchen counter decoration that lasts year after year, and nobody needs to worry about stale cookies. What candy colors would you paint on your little house?
You will need: One terracotta pot and saucer, white puffy paint, acrylic paint in red, green, yellow and blue, a fine brush, craft glue, clear sealer.
How to make it: 1. Flip the pot over and glue the saucer on top as the roof. 2. Pipe white icing lines around the edges, door and windows with puffy paint. 3. Add painted candy buttons, let it dry fully and seal.
Terracotta Reindeer for the Porch
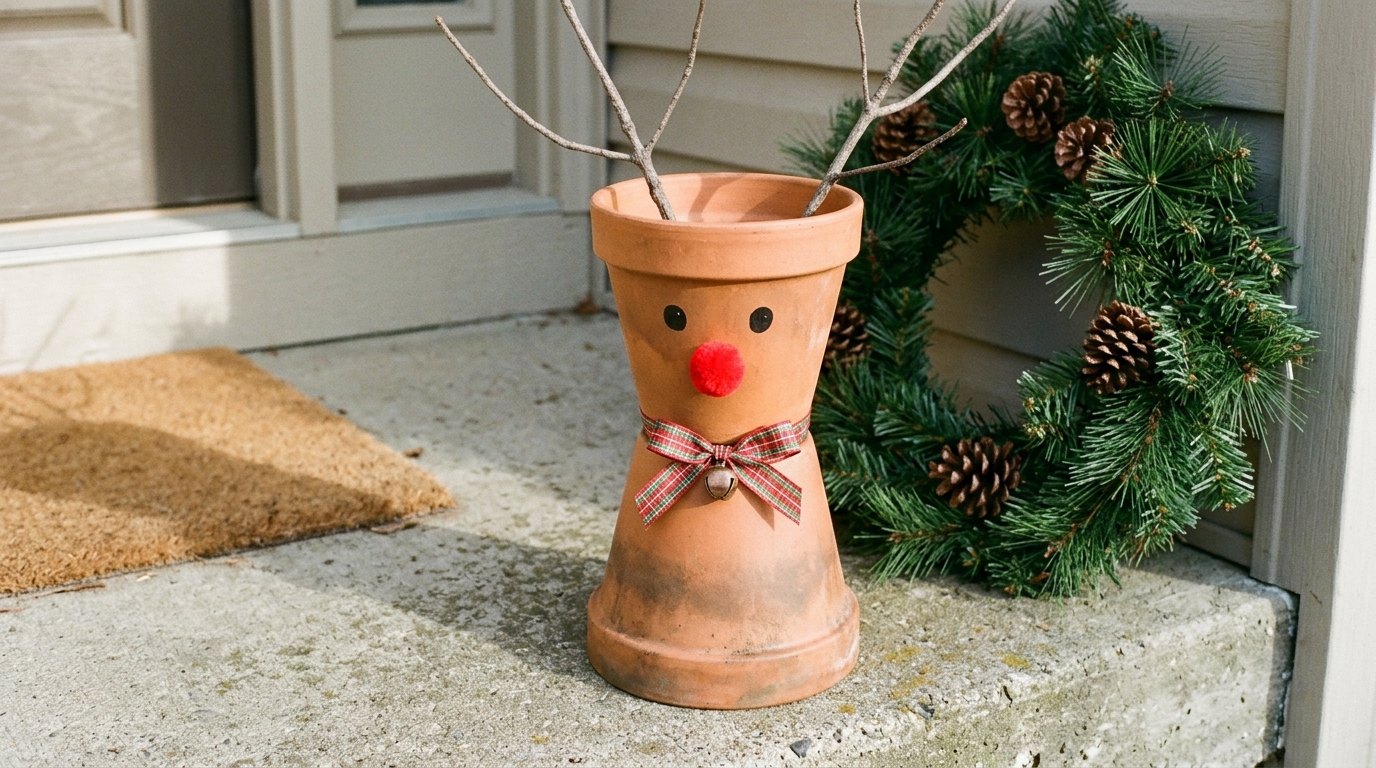
This little reindeer keeps the natural terracotta color, so there is hardly any painting at all. Stack two pots for the head and body, poke real twig antlers into the top, and add a bright red pompom nose and black dot eyes. A plaid ribbon collar with a tiny bell makes him look ready for the big night. Set him by the door next to a wreath, or make a whole team for the steps. Would you name yours after one of Santa’s crew?
You will need: Two terracotta pots, two forked twigs, a red pompom, black paint, plaid ribbon, a small bell, strong glue (adult help), sealer.
How to make it: 1. Glue two pots together rim to rim or stacked for the head and body. 2. Paint the eyes, glue on the pompom nose and push the twigs into the top hole. 3. Tie the plaid collar with the bell and seal the pot.
Candy Cane Striped Planter
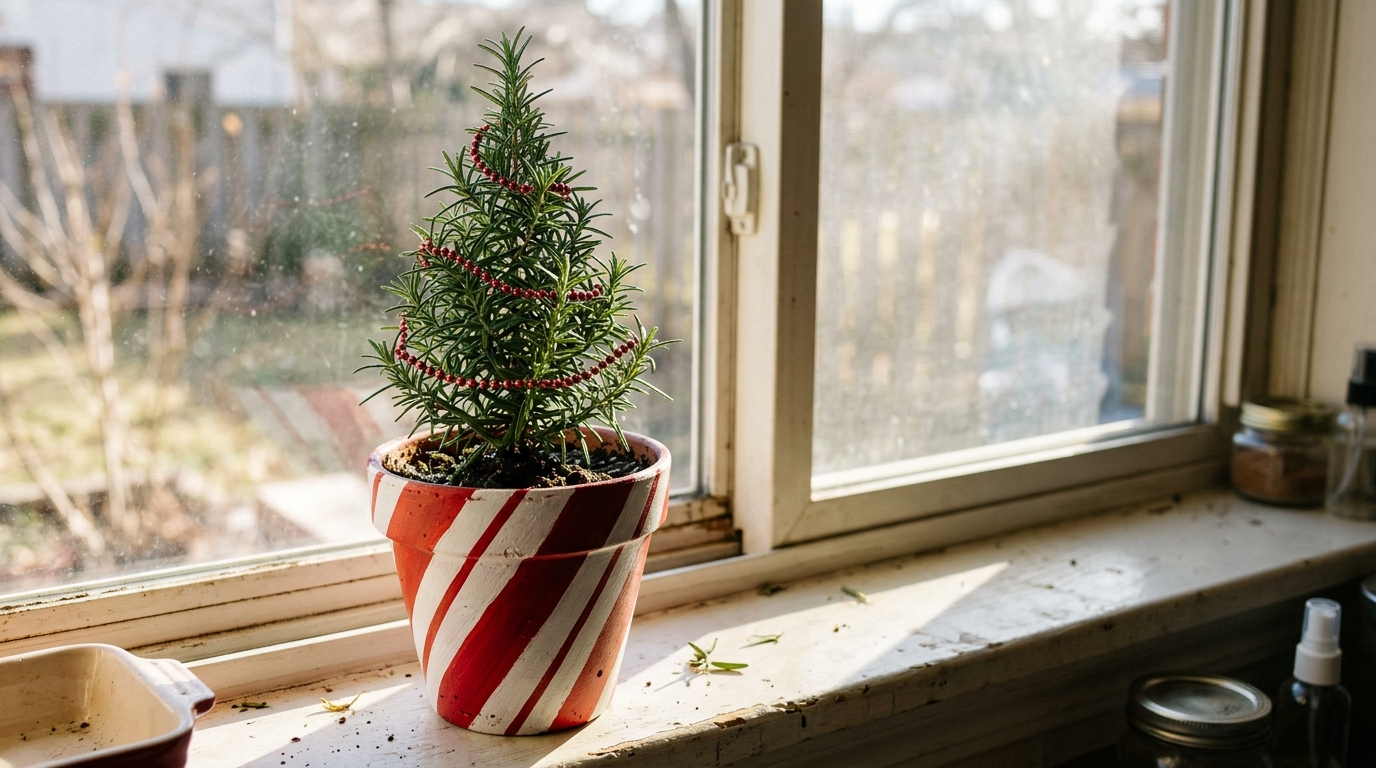
Bold red and white stripes turn any small pot into a happy candy cane planter. Use painter’s tape to mark diagonal stripes, paint the red ones, then peel the tape for clean lines. Pop a little rosemary bush inside and trim it into a mini tree shape, then drape it with a tiny bead garland. It smells lovely, looks festive on a kitchen windowsill and makes a sweet gift for anyone who loves to cook. Would you keep it or give it away?
You will need: One small terracotta pot, white and red paint, painter’s tape, a potted rosemary plant, a tiny red bead garland, sealer for the outside only.
How to make it: 1. Paint the pot white and let it dry. 2. Wrap diagonal tape stripes and paint the gaps red, then peel the tape. 3. Seal the outside, plant the rosemary and wrap it with the bead garland.
Clay Pot Christmas Crafts That Glow: Fairy Light Spill
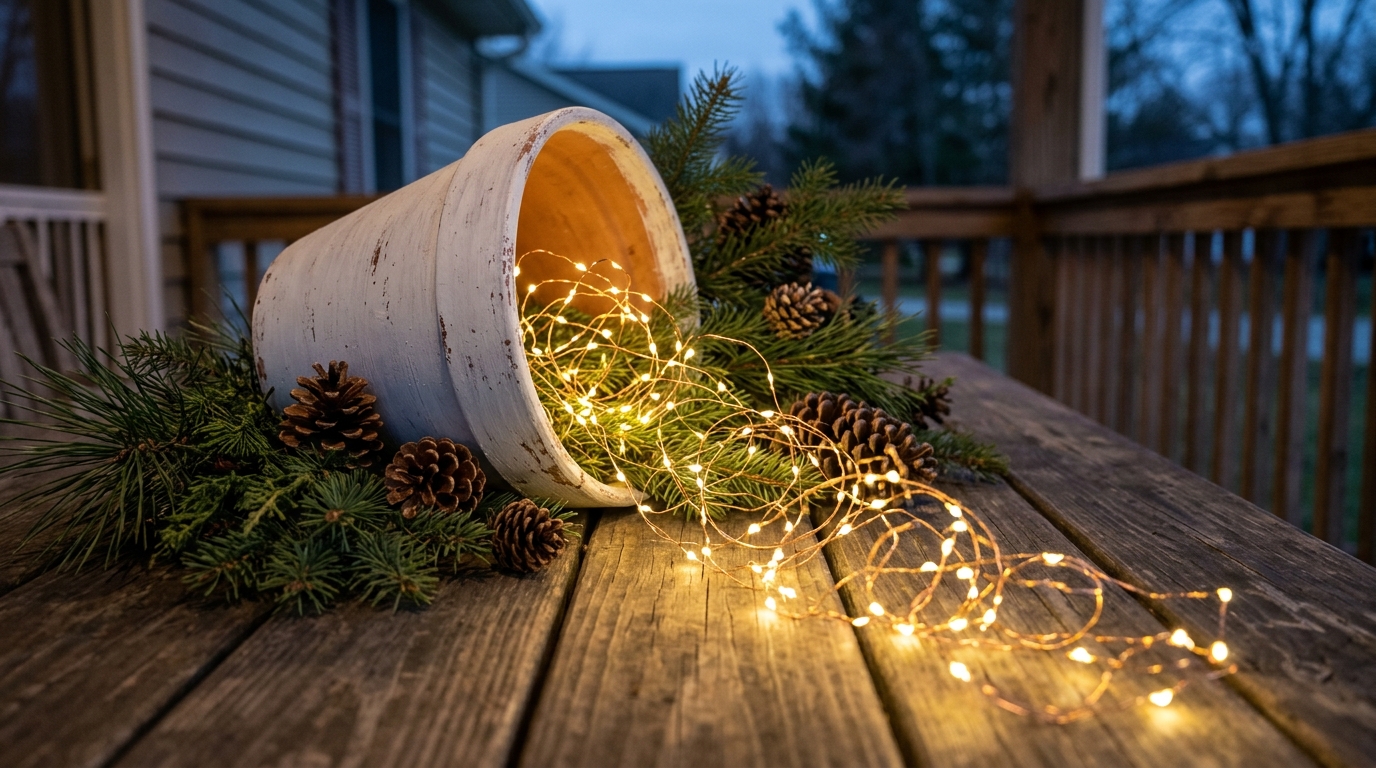
Some of the prettiest clay pot Christmas crafts need no painting skills at all. Lay a white painted pot on its side on a porch table and let a strand of warm battery fairy lights spill out like a glowing stream. Tuck pine cones and greenery around it, and when evening falls it looks like a little river of stars. It is safe, simple and costs only a few dollars. Use battery lights only, never candles. Where would your glowing spill go?
You will need: One medium terracotta pot, white chalk paint, battery fairy lights on copper wire, pine cones, fresh or faux greenery.
How to make it: 1. Paint the pot white and lightly sand the edges for a worn look. 2. Lay it on its side and tuck the battery pack inside. 3. Spread the fairy lights out across the table and fill around them with pine cones and greenery.
Mini Pot Elves for the Mantel
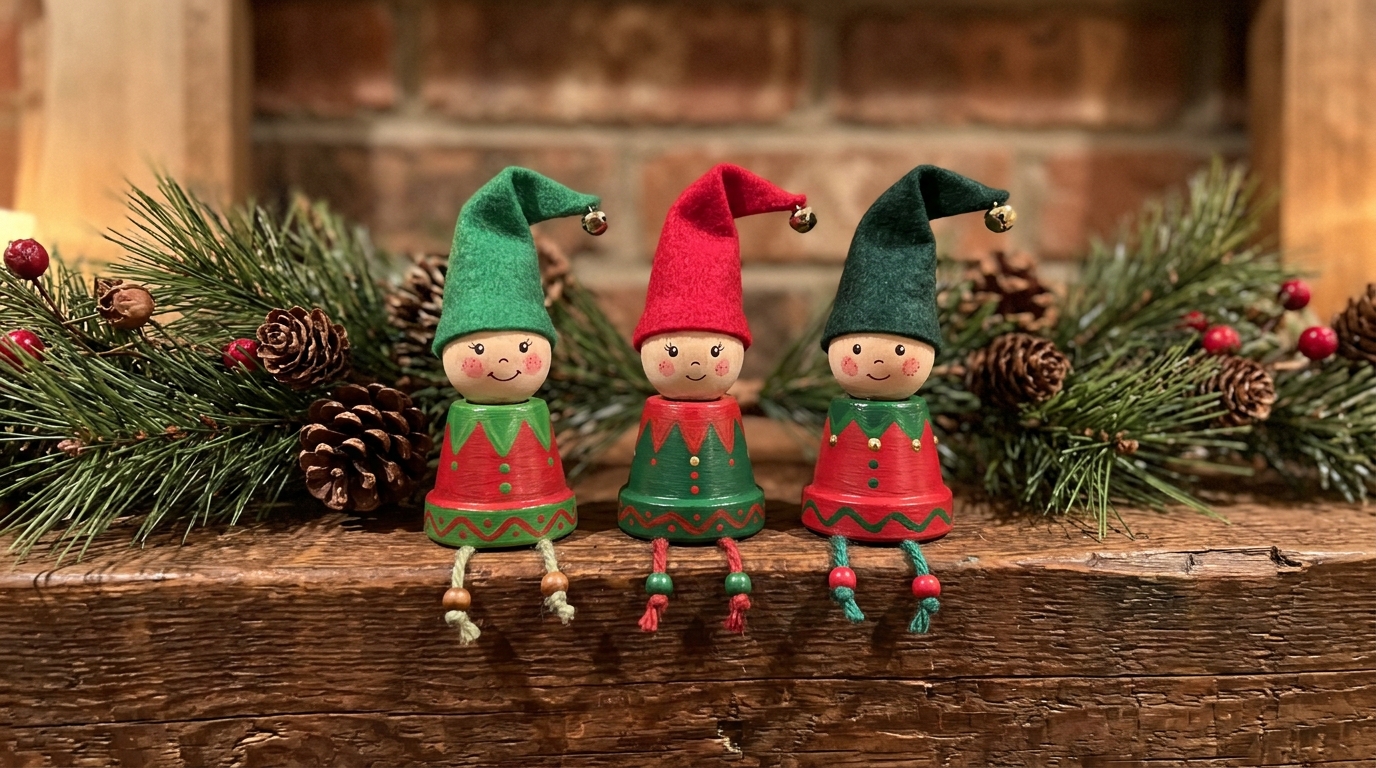
Tiny pots make the cutest little elves, and kids and grown ups can build them together. Paint mini pots red and green, glue a wooden bead on top for the head and add a pointy felt hat with a bell. Little painted rosy cheeks and dot eyes give each one a personality, and felt legs let them sit along the edge of a mantel or shelf. Line up three or five in a row with garland behind them. How many elves would join your crew?
You will need: Mini terracotta pots, large wooden beads, red and green paint, pink and black paint for faces, felt, tiny bells, craft glue.
How to make it: 1. Paint the pots red and green and let them dry. 2. Glue a wooden bead on each and paint simple faces. 3. Cut felt hats and legs, glue them on and add a bell to each hat tip.
Clay Pot Christmas Crafts for the Tree: Bell Ornaments

These little bell ornaments are among the sweetest clay pot Christmas crafts you can hang on a tree. Paint tiny pots in metallic gold, silver and red, then thread a velvet ribbon through the hole with a big wooden bead hanging below as the clapper. Upside down, they look exactly like old fashioned Christmas bells. Make a set for your own tree and an extra few to tie on gifts. Which metallic shade would look best on your tree?
You will need: Mini terracotta pots, metallic gold, silver and red paint, velvet ribbon, large wooden beads, strong thread or twine.
How to make it: 1. Paint the pots in metallic shades, two coats each. 2. Tie a bead to a length of ribbon and thread it up through the hole. 3. Knot the ribbon at the top to make a hanging loop.
Tiered Pot Cookie Stand

A three tier cookie stand is the kind of thing that costs a lot in a home store, but you can make one with upturned pots and plain white plates. Paint the pots a soft cream so they look like stoneware, then glue plates on top in three levels. Load it with frosted sugar cookies and gingerbread men for a holiday party and watch guests reach for them. Keep the cookies on the plates only, since pots are not food safe. What would you pile on top?
You will need: Three terracotta pots in graduated sizes, three white ceramic plates, cream paint, strong glue made for ceramics (adult help).
How to make it: 1. Paint the pots cream and let them dry fully. 2. Glue the large pot to the largest plate, then build up the next two levels. 3. Let the glue cure for a full day, then fill the plates with cookies.
Plastic Planter Tree Collar That Looks Like Brass

This is the planter hack that has crafters buzzing online. A cheap plastic planter painted with shiny metallic gold turns into a tree collar that looks like an expensive brass urn. Cut the bottom out if needed, slide it around the base of a small tree and nobody will guess it came from the garden aisle. It hides the stand, adds a touch of luxury and leaves room for gifts. Could this be the easiest upgrade your tree gets this year?
You will need: One large plastic planter, plastic primer spray, metallic gold spray paint, a craft knife (adult help), a small Christmas tree.
How to make it: 1. Clean the planter and spray it with plastic primer outdoors. 2. Add two light coats of metallic gold paint and let it dry. 3. Cut out the base if needed and set it around the tree stand.
Clay Pot Christmas Crafts to Give: Neighbor Cocoa Pots

Clay pot Christmas crafts also make wonderful little gifts. Paint a small pot red with white snowflakes, fill it with cocoa packets and peppermint candies, then tie a big plaid bow around the rim with a kraft paper tag. Leave one on each neighbor’s doormat for a cheerful surprise. After the cocoa is gone, the pot can hold a plant, pens or kitchen tools all year. Who on your street would love to find one at the door?
You will need: Small terracotta pots, red and white paint, a fine brush, cocoa packets, wrapped peppermint candies, plaid ribbon, kraft paper tags, tissue paper.
How to make it: 1. Paint the pots red and add white snowflakes with a fine brush. 2. Line each with tissue and fill with cocoa packets and candies. 3. Tie on a plaid bow and a handwritten tag.
Terracotta Snow Globe
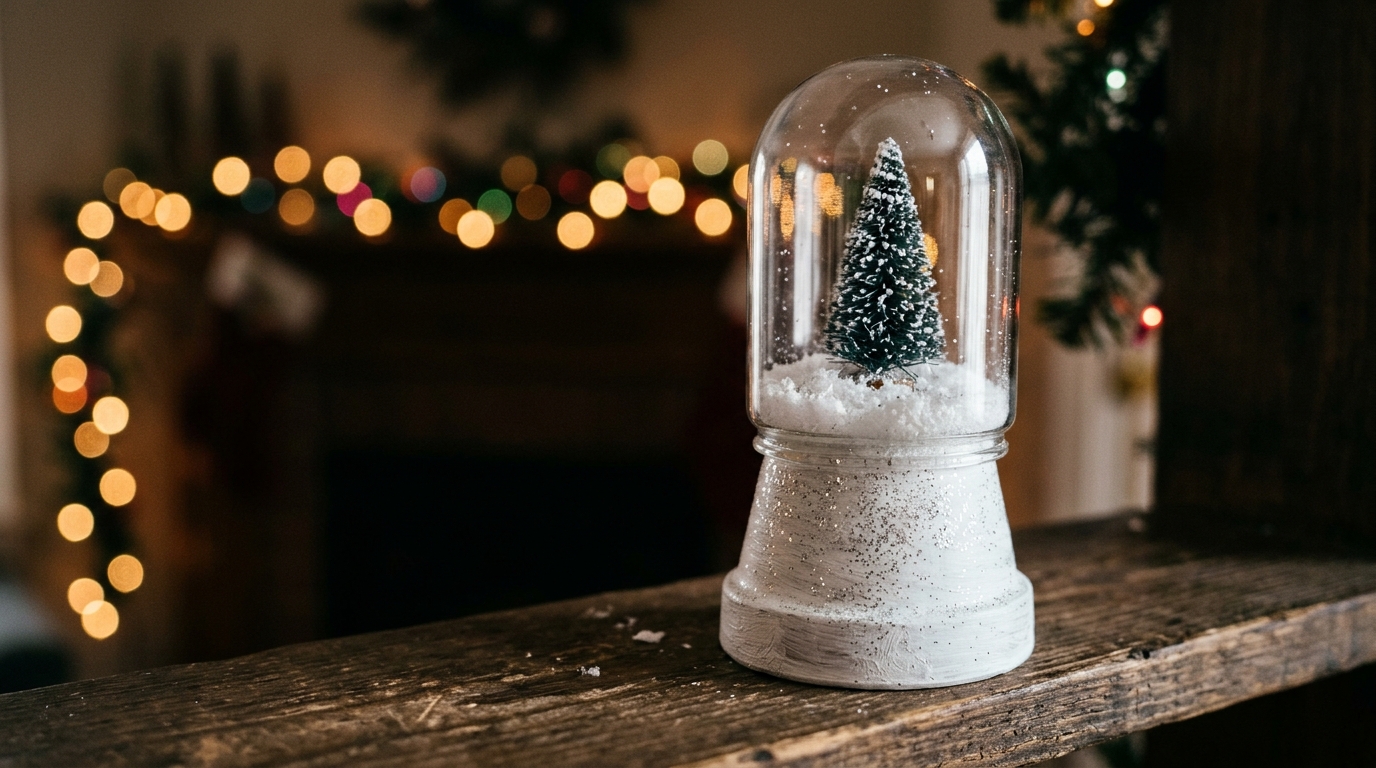
A glass cloche on top of a little pot makes a snow globe you never have to shake. Paint a small pot white, brush on glue and roll it in silver glitter, then flip it over to make a sparkly base. Inside the dome, set a tiny bottle brush tree on a bed of fake snow. It looks beautiful on a bookshelf with twinkle lights behind it and costs a fraction of a store bought one. What tiny scene would you put inside yours?
You will need: One small terracotta pot, white paint, craft glue, silver glitter, a small glass cloche or jar, a mini bottle brush tree, fake snow.
How to make it: 1. Paint the pot white, then brush on glue and add glitter. 2. Flip it over and glue the tree onto the base with fake snow around it. 3. Set the glass dome on top.
Clay Pot Christmas Crafts for Winter: Penguin Pair
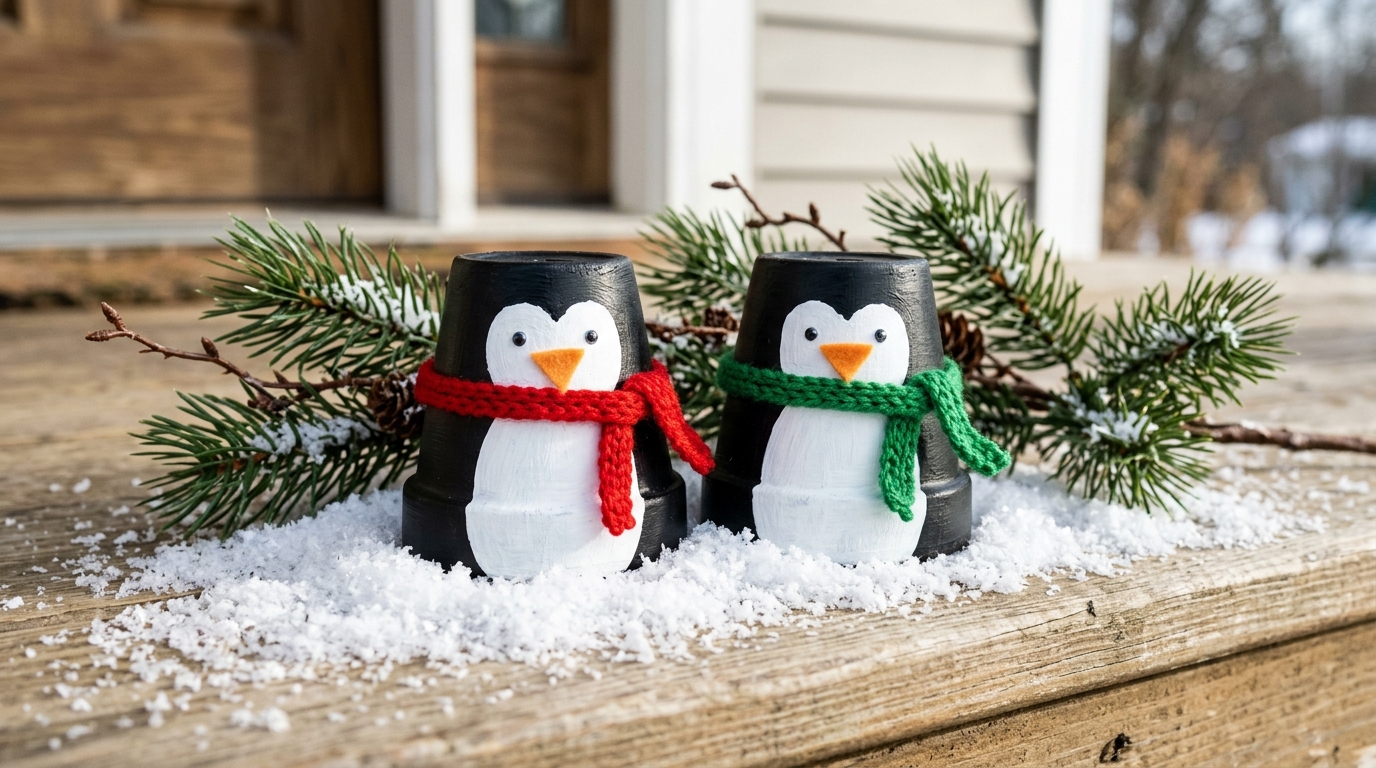
Finish the list with a pair of penguins that can stay out long after Christmas. These clay pot Christmas crafts start with small pots painted black with a white tummy, then a tiny orange felt beak and a knit scarf. Set them on a bed of fake snow on the porch or tuck them among pine branches on a table. They work for all of winter, so you get weeks more joy from one evening of crafting. Which pair of scarf colors would you pick?
You will need: Two small terracotta pots, black, white and orange paint, orange felt, scrap yarn or knit fabric for scarves, craft glue, sealer.
How to make it: 1. Paint the pots black and add a white oval tummy and face. 2. Glue on felt beaks and paint small eyes. 3. Wrap and glue tiny scarves around each neck and seal for outdoor use.