DIY Faux Fireplace: 15 Cozy Christmas Builds for Homes That Never Had a Mantel
A DIY faux fireplace is the answer for every apartment, condo and new build home that has nowhere to hang the stockings. Sound familiar? You are not alone. One cardboard fireplace video on YouTube has passed 2.5 million views, and the comments are packed with people saying they finally have a mantel for Christmas. The best part is the price. A store bought mantel can cost three hundred dollars or more, but most of these builds use boxes, thrift finds and a little paint. There is no real fire, no candles and no wiring, just a warm, cozy spot for garland and stockings. Below are fifteen builds for every skill level. Which one will fit your living room..
Cardboard Box DIY Faux Fireplace
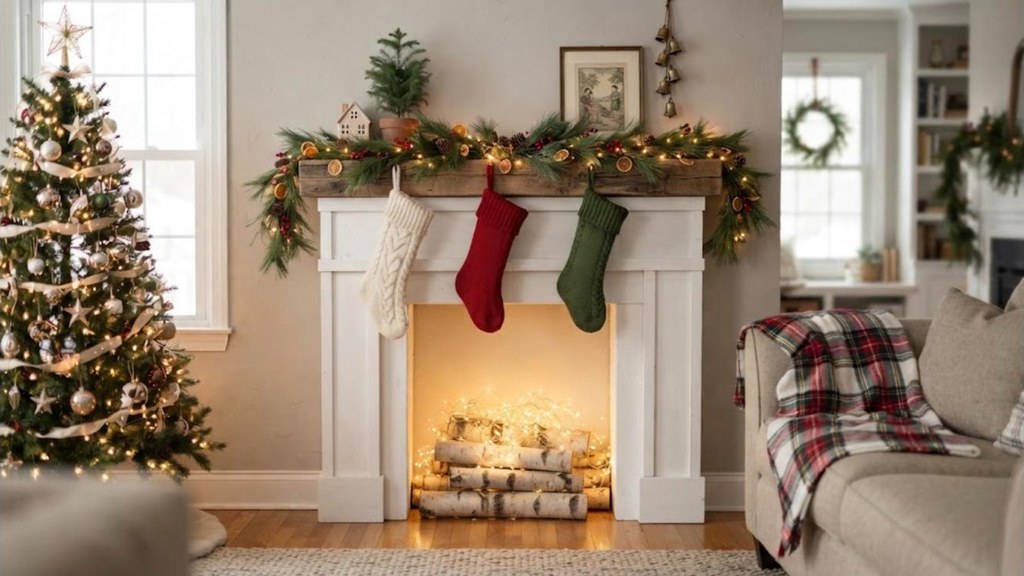
This is the one that made the whole idea go viral. Save a few big moving boxes, tape them into a fireplace shape and paint the outside white. Line the opening with brick contact paper, and suddenly it looks like the real thing. Glue on strips of foam board or cardboard as trim to fake the molding. Add a wood shelf on top so it can hold garland and stockings. From across the room, nobody can tell it started life as a box from the garage. Your whole DIY faux fireplace can cost less than twenty dollars, and it folds down for storage when the season is over. Ready to raid the recycling bin..
You will need: 2 to 3 large cardboard boxes, packing tape, white paint, brick contact paper, hot glue, foam board strips, a thin wood shelf.
How to make it: 1. Tape the boxes into a fireplace shape with an opening. 2. Paint the outside white. 3. Line the opening with brick paper. 4. Glue on trim and set the shelf on top.
Thrifted Mantel Surround
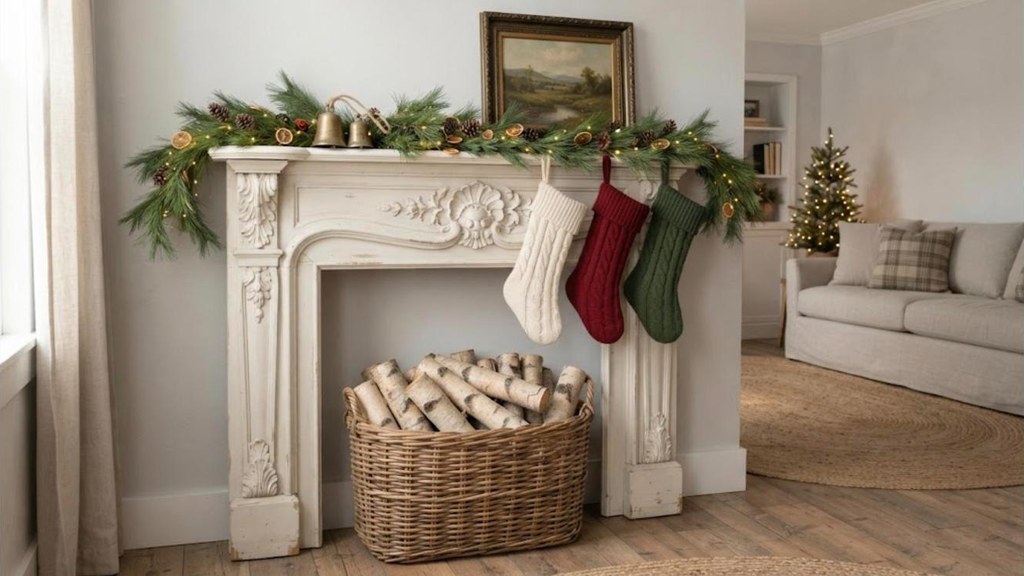
Old fireplace mantels show up at thrift stores, salvage yards and on Facebook Marketplace all the time, often for less than fifty dollars. People pull them out during remodels and just want them gone. Look for one with pretty carved details, then give it two coats of chalk paint in white, cream or soft green. Chalk paint sticks to old finishes without much sanding, which saves a whole afternoon. Lean it against the wall and secure the top with a small wall anchor so it cannot tip. The real wood and old details make it feel like it has always been there. Have you ever checked the salvage section of your local thrift store?
You will need: A thrifted wood mantel, chalk paint, a paintbrush, sandpaper, one wall anchor or furniture strap.
How to make it: 1. Clean and lightly sand the mantel. 2. Paint two coats of chalk paint. 3. Lean it against the wall. 4. Strap or anchor the top for safety.
Bookshelf Turned DIY Faux Fireplace
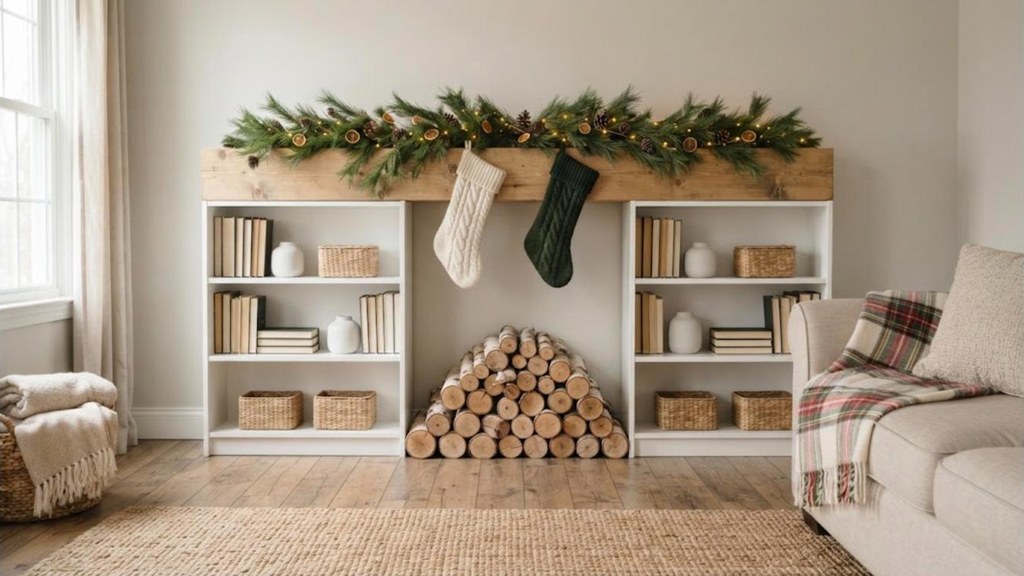
Here is a smart build that gives you a mantel and extra storage at the same time. Place two short bookcases a few feet apart, then lay one long board across the top so they join into one piece. The gap in the middle becomes your firebox. Add a strip of simple molding along the front edge of the board and paint everything the same color. Now it looks built in. Fill the shelves with books, baskets and a few pretty vases. This DIY faux fireplace works all year long, so it keeps earning its spot after the holidays. If you already own two matching shelves, you only need to buy the board and a little paint.
You will need: 2 short matching bookcases, 1 long wood board, simple molding, wood glue, paint, a brush.
How to make it: 1. Set the bookcases a few feet apart. 2. Lay the board across the top and glue it down. 3. Add molding to the front edge. 4. Paint everything one color.
Faux Brick Panel Build
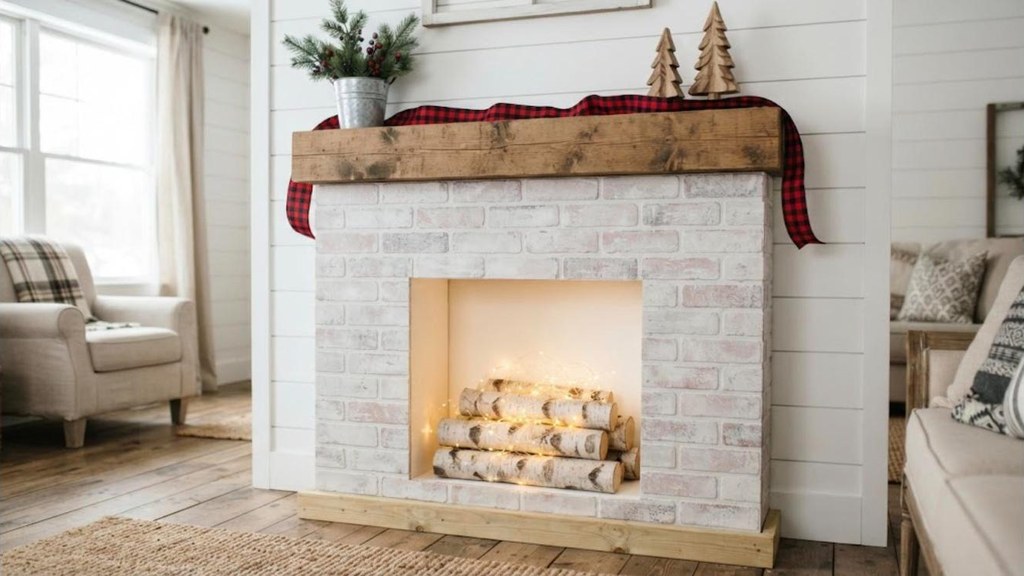
Want that farmhouse brick look without a mason? Faux brick paneling comes in big sheets at the home improvement store, and it is light enough to cut with a simple saw. Build a basic box frame from pine boards, then nail or glue the panel to the front. Brush on a thin coat of watered down white paint and wipe some of it off with a rag. That quick whitewash makes the brick look aged and real. Top it with a thick wood shelf stained a warm brown. It looks heavy and expensive, but the whole thing weighs very little. Pair it with buffalo check ribbon and galvanized metal for the full farmhouse feel.
You will need: Pine boards, 1 sheet of faux brick paneling, wood glue, small nails, white paint, a rag, a thick wood shelf, stain.
How to make it: 1. Build a simple box frame with an opening. 2. Attach the brick panel to the front. 3. Whitewash the brick and wipe it back. 4. Add the stained shelf on top.
Peel and Stick Tile Firebox
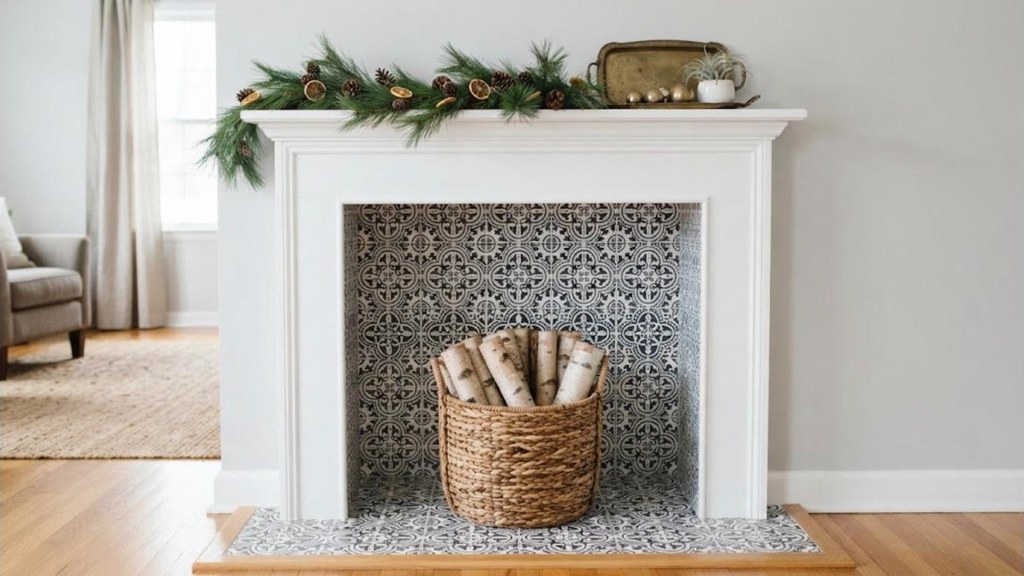
The inside of the opening is where you can really show off. Peel and stick tiles come in marble, Moroccan, subway and checkerboard patterns, and some dollar stores and discount shops sell them by the sheet. Just cut them to size with scissors and press them onto the back and sides of the firebox. You can also run a row along the front where a hearth would be. It takes less than an hour and looks like a designer tile job. Since nothing gets hot, the tiles stay put all season. Do you love bold pattern or soft marble? Either way, this one change makes even a simple cardboard build look custom.
You will need: Peel and stick tile sheets, scissors, a ruler, a pencil, a faux fireplace frame.
How to make it: 1. Measure the back and sides of the opening. 2. Cut the tiles to size. 3. Peel and press them on, smoothing out bubbles. 4. Add a tile row along the front.
Birch Log Display Firebox
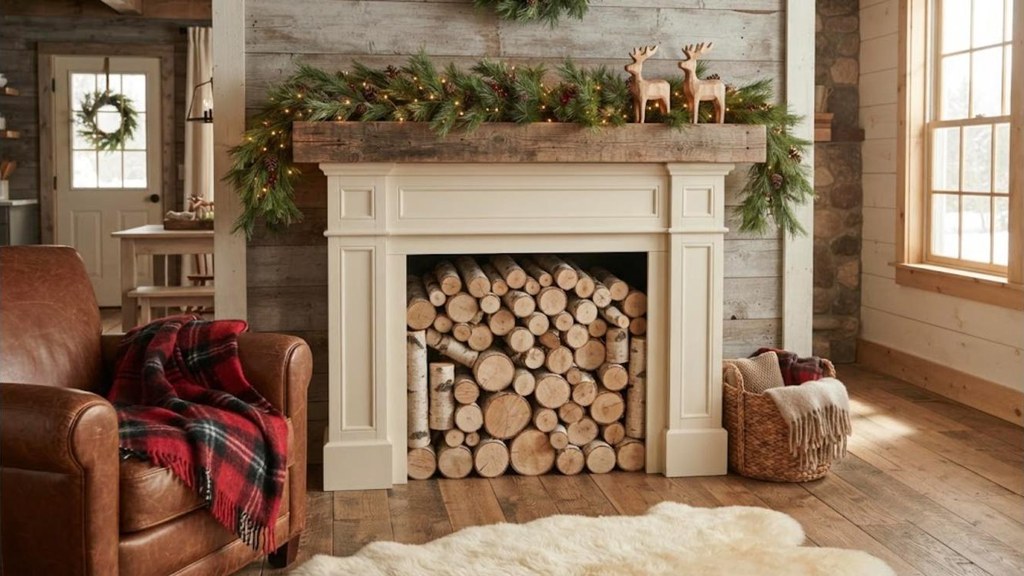
An empty opening can look a little sad, so fill it with logs. White birch logs look beautiful stacked in neat rows, and they make the whole thing feel like a mountain cabin. Craft stores sell bundles, and you can often find fallen birch branches for free. Faux logs work too and never shed bark on the floor. Stack the biggest ones on the bottom and the smallest on top. Mix in a few pinecones if you like. Since there is no fire, you can use any wood you find pretty. Is there a simpler way to make a DIY faux fireplace feel cozy? This one costs almost nothing and looks wonderful from the very first day.
You will need: Birch logs or faux logs, a few pinecones, an optional low basket or log holder.
How to make it: 1. Measure the opening. 2. Cut or pick logs that fit. 3. Stack the largest on the bottom. 4. Tuck pinecones into the gaps.
DIY Faux Fireplace Glow Without Fire
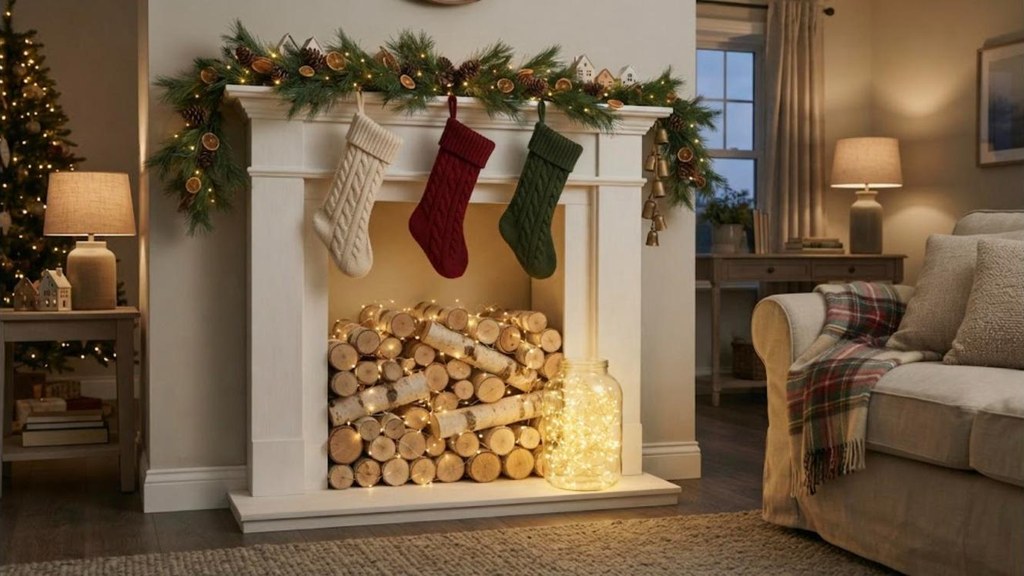
This is the trick that makes people stop and ask if your fireplace is real. Tuck a strand of battery operated fairy lights between the logs and let them glow. In a dim room, the soft warm light looks just like glowing embers. Try a big glass jar stuffed with more lights for an extra glow. Pick warm white bulbs, not cool white, because warm light feels cozy. Most battery packs have a timer, so the lights turn on every evening by themselves. It is safe, it stays cool to the touch, and kids and pets can be around it. Your DIY faux fireplace now has the cozy glow without any of the worry.
You will need: 2 to 3 strands of warm white battery fairy lights with timers, logs, a large glass jar.
How to make it: 1. Weave the light strands between the logs. 2. Hide the battery packs behind the logs. 3. Fill a jar with another strand. 4. Set the timer for the evening.
Renter Friendly DIY Faux Fireplace
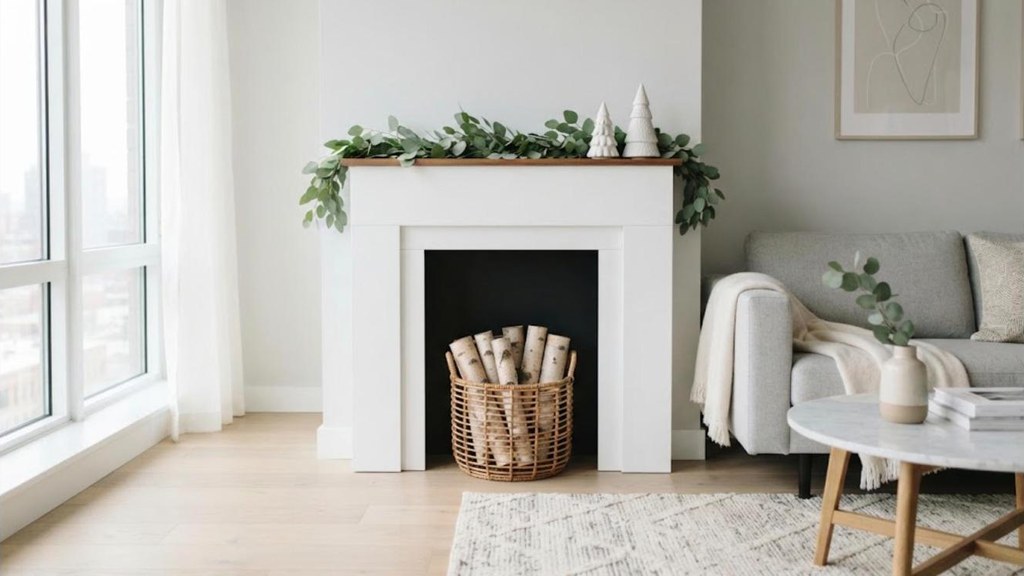
Renting does not mean you have to skip the mantel. This version stands on its own and leans against the wall, so there are no holes and no angry landlord. Build a light frame from thin boards, add felt pads to the back so it will not scuff the paint, and use one removable strip near the top for extra hold. Keep the decor on top light so it stays steady. When January comes, slide it into a closet or behind the couch. Many renters say this DIY faux fireplace was their favorite holiday project because it goes with them to every new place. Moving next year? It packs up as easily as a bookcase.
You will need: Thin pine boards, wood screws, white paint, felt pads, removable mounting strips.
How to make it: 1. Build a light frame with an opening. 2. Paint it white. 3. Stick felt pads on the back edges. 4. Lean it on the wall and add one removable strip at the top.
Floating Shelf Mantel Only
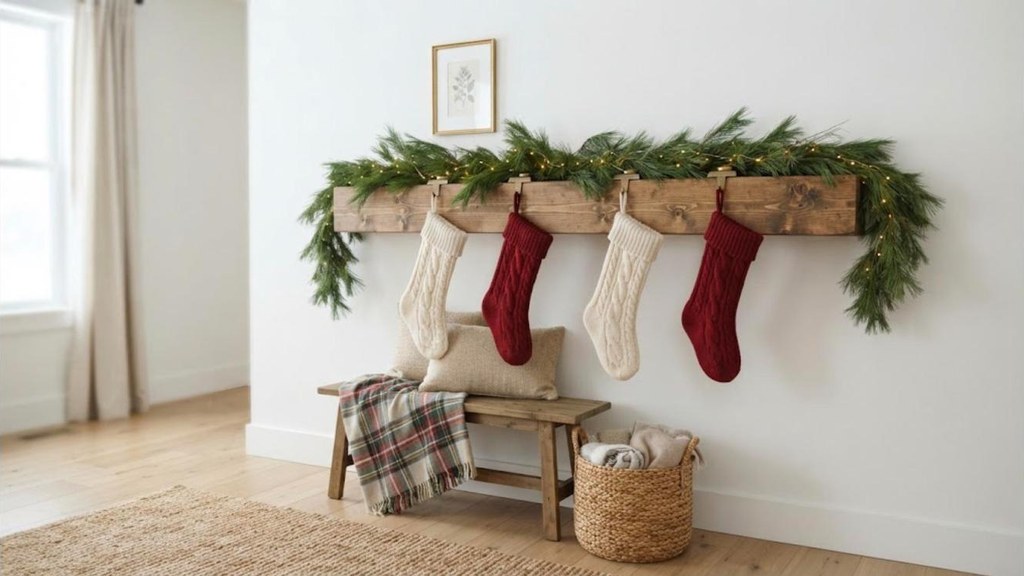
Short on space and time? Skip the whole fireplace and hang just the mantel. A chunky wood beam or a thick board stained in a warm color looks rich and solid on the wall. Mount it with heavy duty brackets at about the height a real mantel would be. Then style it with garland and stockings like any other mantel. Underneath, set a bench, a basket of blankets or a small console. Your eye fills in the rest. This is the cheapest look on the list, and it stays up all year as a shelf for photos and plants. Do you have a blank wall that has been begging for something?
You will need: A thick board or wood beam, wood stain, 2 heavy duty shelf brackets, a drill, a level, wall anchors.
How to make it: 1. Stain the board and let it dry. 2. Mark a level line on the wall. 3. Mount the brackets with anchors. 4. Screw the shelf onto the brackets.
Old Door or Shutter Fireplace
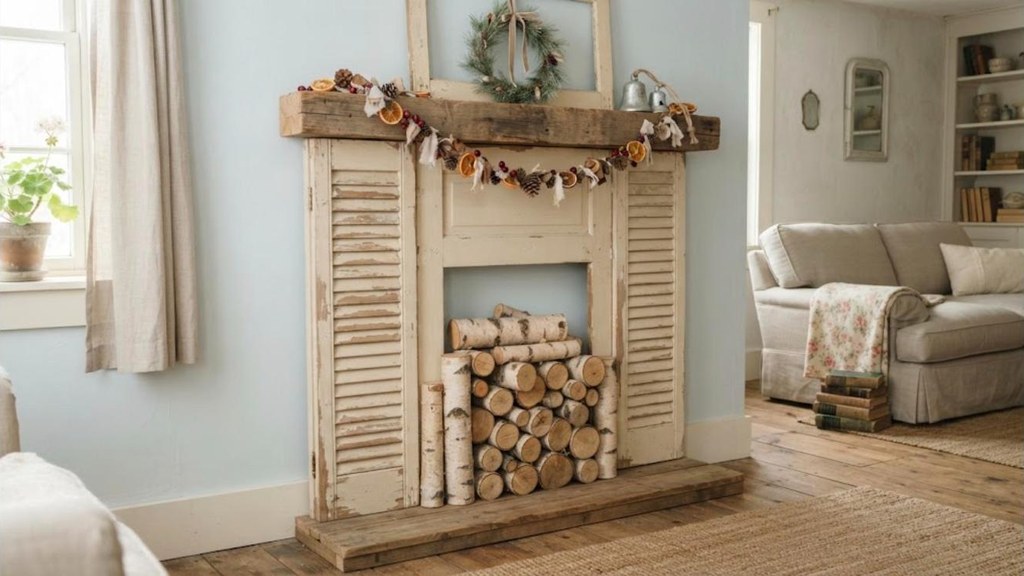
Old doors and shutters have so much character, and thrift stores are full of them. Two tall shutters on the sides and a short panel or old door piece across the top make a fireplace shape in no time. Glue and screw the pieces together from the back, then add a simple wood shelf. Paint it cream or soft white and lightly sand the edges so the old layers peek through. That chippy look is pure shabby chic. Each piece is one of a kind, so no one else will have a fireplace quite like yours. Doesn’t it feel good to give an old door a new job for the holidays?
You will need: 2 thrifted shutters, 1 short door panel or board, wood glue, screws, cream paint, sandpaper, a wood shelf.
How to make it: 1. Lay the shutters and top panel in a fireplace shape. 2. Glue and screw them from the back. 3. Paint and lightly sand the edges. 4. Add the shelf on top.
Painted Stone Look Surround
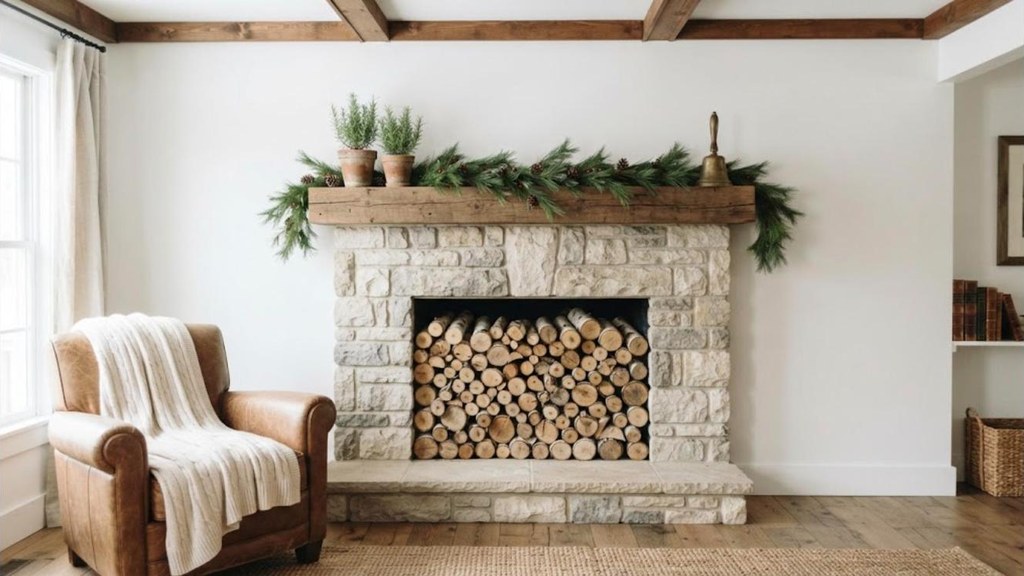
Love the look of an old stone cottage? You can fake it with foam board. Cut sheets of foam insulation board into stone shapes with a craft knife, rounding the edges a little so they look worn. Glue them onto a simple frame, leaving small gaps between each stone. Then dab on gray, cream and beige paint with a sponge, layering the colors until it looks like real rock. Fill the gaps with a darker gray. It is light, cheap and surprisingly real looking. This DIY faux fireplace takes a weekend, but the result feels like a little piece of the French countryside. Take your time with the sponge, because that is where the magic happens.
You will need: Foam insulation board, a craft knife, foam safe glue, a simple frame, gray, cream and beige paint, a sponge.
How to make it: 1. Cut the foam into stone shapes. 2. Glue them onto the frame with small gaps. 3. Sponge on layers of paint. 4. Paint the gaps darker gray.
Mirror Firebox Trick
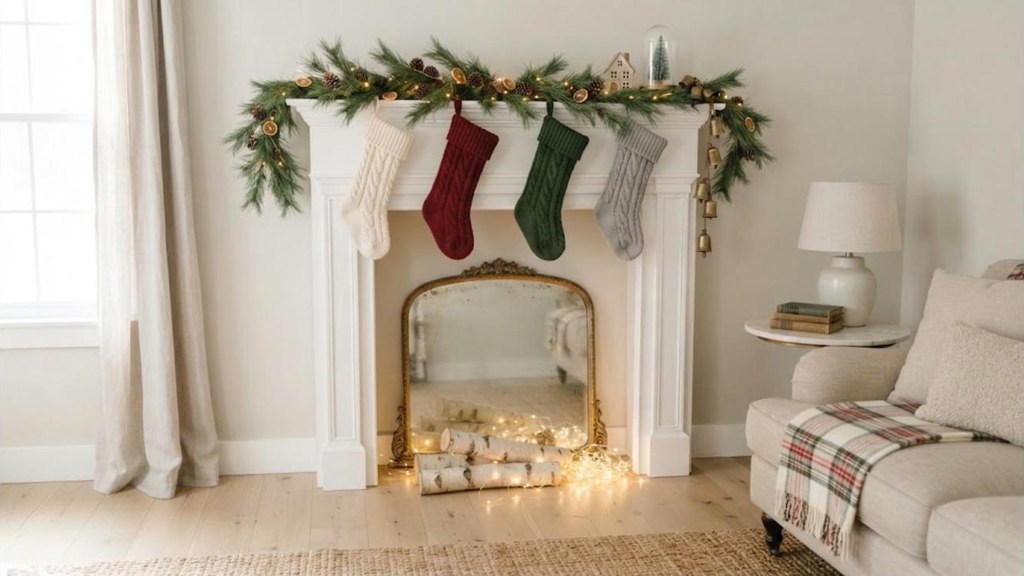
Here is a clever trick for small rooms. Set a mirror inside the back of the firebox. It bounces light around, makes the opening look deeper and helps a tiny living room feel bigger. Old mirrors at thrift stores often cost just a few dollars, and the slightly aged glass looks lovely. Put a few logs and fairy lights in front, and the reflection doubles the glow. You can glue the mirror in with strong mounting tape or just lean it against the back. It is an easy upgrade for any build on this list. Who knew one thrifted mirror from the bargain shelf could make such a difference to a whole room?
You will need: A thrifted mirror sized to the opening, mounting tape, a few logs, battery fairy lights.
How to make it: 1. Measure the back of the opening. 2. Find or cut a mirror to fit. 3. Secure it with mounting tape. 4. Add logs and lights in front.
Corner Faux Fireplace
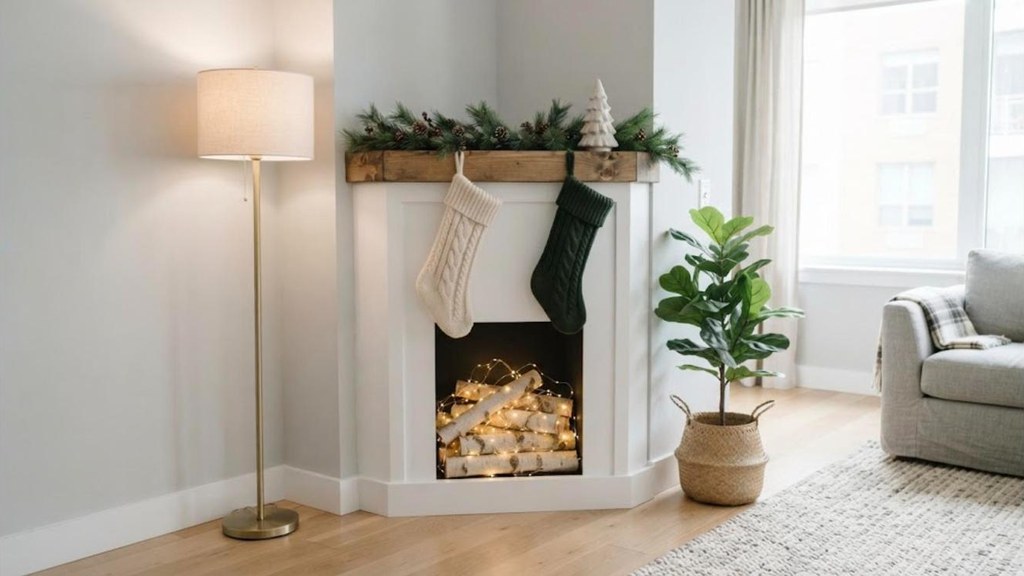
Every apartment seems to have one empty corner that never knows what to be. Turn it into a fireplace. A corner build has three sides that angle to fit the space, so it takes up very little floor. Cut plywood panels, join them with small screws and trim the front with simple molding. A triangle shaped shelf on top gives you just enough room for garland and two stockings. Paint it the same color as your walls or trim so it looks built in. It is a small project that makes a big change, and it turns a forgotten spot into the coziest part of the room. Which corner in your home is waiting for this?
You will need: Thin plywood, trim molding, small screws, wood glue, paint, a triangle wood shelf.
How to make it: 1. Measure the corner. 2. Cut three plywood panels to fit the angle. 3. Join them and add molding. 4. Paint and set the shelf on top.
Styling Your DIY Faux Fireplace for Stockings
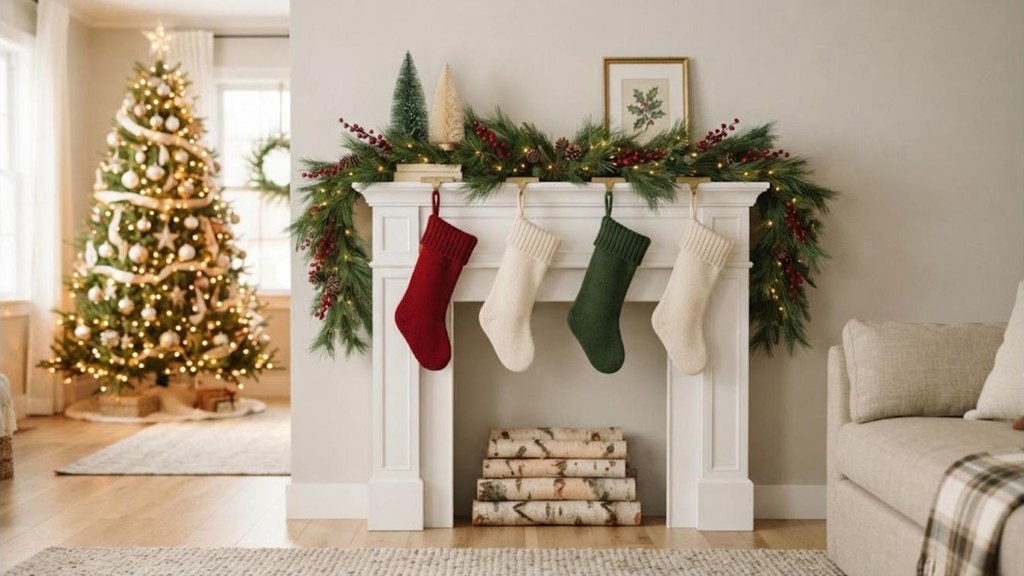
Once your DIY faux fireplace is built, the fun part begins. Start with garland. A dollar store garland looks much fuller when you twist two strands together, then tuck in red berry picks and pinecones every few inches. Hang stockings with weighted holders or simple hooks screwed into the underside of the shelf. Add something tall on one side, like a small tree, and something short on the other to keep it balanced. Finish with one framed print or a small wreath in the middle. Do not overfill it. A few good pieces look more expensive than a crowded shelf. Your new mantel is ready for its first Christmas morning.
You will need: Dollar store garland, berry picks, pinecones, stocking holders or hooks, stockings, a small tree, a framed print.
How to make it: 1. Twist two garlands together and lay them on the shelf. 2. Tuck in berry picks and pinecones. 3. Hang the stockings. 4. Add a tall piece and a short piece for balance.
Store It Flat After Christmas
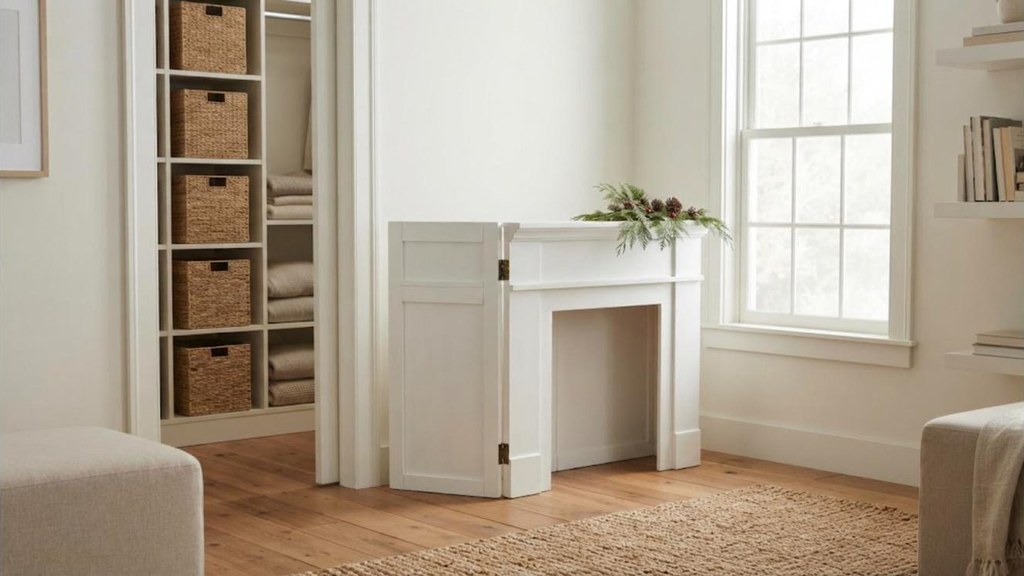
The smartest builders plan for January. Make your fireplace from three flat panels, the front and two sides, then join them with small hinges. When the holidays end, take off the shelf and fold the panels flat. They slide behind a couch, under a bed or into a closet. Next year, unfold it and you are decorated in minutes. Label the screws and shelf brackets in a zip bag so nothing goes missing. This one small step means your work lasts for years, not just one season. Isn’t it nice to know next Christmas is already half done? That is how one simple weekend project turns into a family tradition.
You will need: 3 panel boards, 4 to 6 small hinges, screws, a screwdriver, a zip bag, a marker.
How to make it: 1. Build the front and side panels separately. 2. Join them with hinges. 3. Set the shelf on top with removable brackets. 4. Fold flat and store after the holidays.