Thanksgiving Centerpieces: 16 Dollar Store Ideas That Look Like a Florist Made Them
Thanksgiving centerpieces do not have to cost a fortune to look stunning on your table. With the big day only a few weeks away, now is the time to plan, and the dollar store is your best friend. One Dollar Tree Thanksgiving tablescape video has been watched more than 244,000 times, so you are clearly not the only one looking for a deal. Below you will find 16 ideas made from faux pumpkins, wheat, thrifted bowls, fruit, and a little glue. Some take five minutes. Some take an afternoon. All of them look like you hired a florist. Which one will sit in the middle of your table this year..
Dough Bowl Thanksgiving Centerpieces
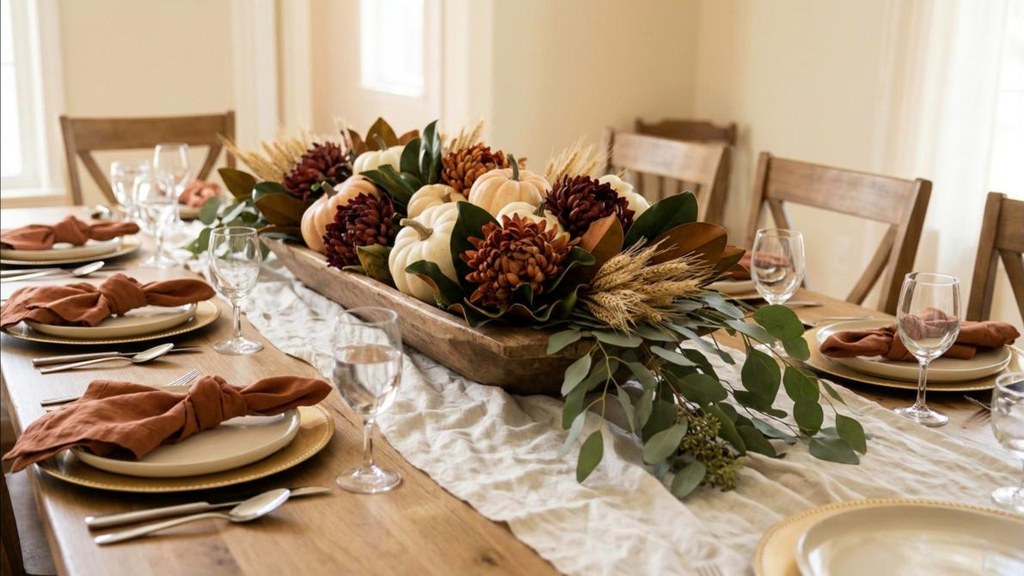
If you only make one centerpiece this year, make this one. A long wooden dough bowl filled with little pumpkins, faux mums, wheat, and trailing greenery looks like it came straight from a farmhouse magazine. You can find wooden bowls at the dollar store, or grab a thrifted dough bowl for a few dollars more. Start with a layer of crumpled paper or floral foam so you do not need as much filler. Then tuck in the biggest pumpkins first, add the flowers, and finish with wheat and eucalyptus spilling over the sides. Keep it low so everyone can still see each other across the table. Isn’t that half the fun of the meal..
You will need: Wooden dough bowl, faux pumpkins, faux mums, wheat, eucalyptus, floral foam.
How to make it: 1. Fill the bowl halfway with foam. 2. Nestle in the pumpkins. 3. Tuck in mums, wheat and greenery.
Hollowed Pumpkin Vase
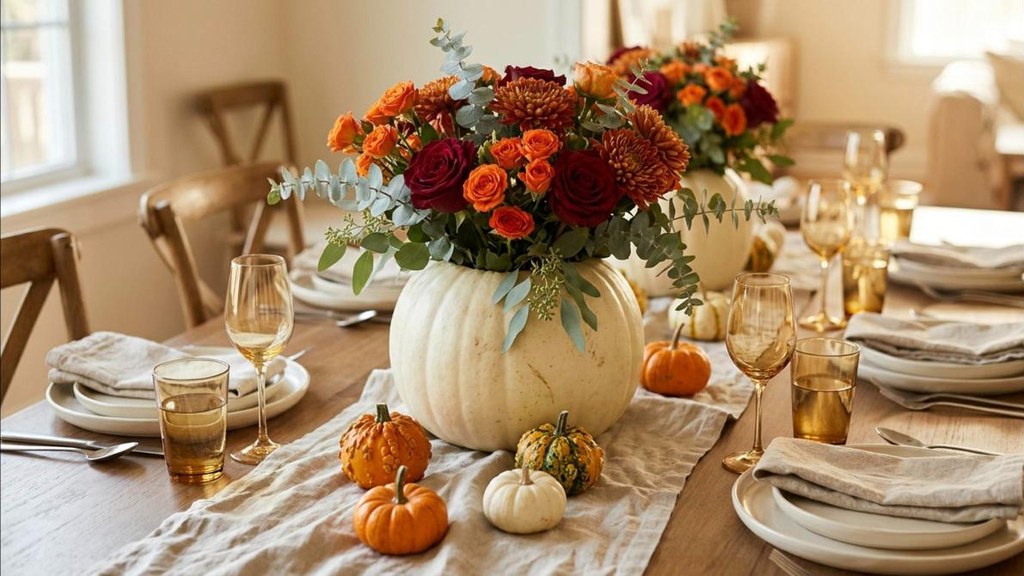
A pumpkin makes the cutest vase you will ever own. Cut off the top of a real pumpkin or a craft pumpkin, scoop out the inside, and slip a glass jar in the middle to hold water. Then fill it with a grocery store bouquet. Roses, mums, and spray roses in burgundy and orange look gorgeous, and a few eucalyptus stems add softness. Using a jar inside means the pumpkin will last longer and will not leak on your tablecloth. A white pumpkin with deep red flowers looks extra elegant. A green heirloom pumpkin feels a bit more rustic. Either way, people will ask where you bought it. It is one of the prettiest Thanksgiving centerpieces you can make in under twenty minutes.
You will need: A real or craft pumpkin, a glass jar, and a grocery bouquet.
How to make it: 1. Cut and scoop out the pumpkin. 2. Set a jar of water inside. 3. Arrange short flowers in the jar.
Mason Jar Thanksgiving Centerpieces With Wheat
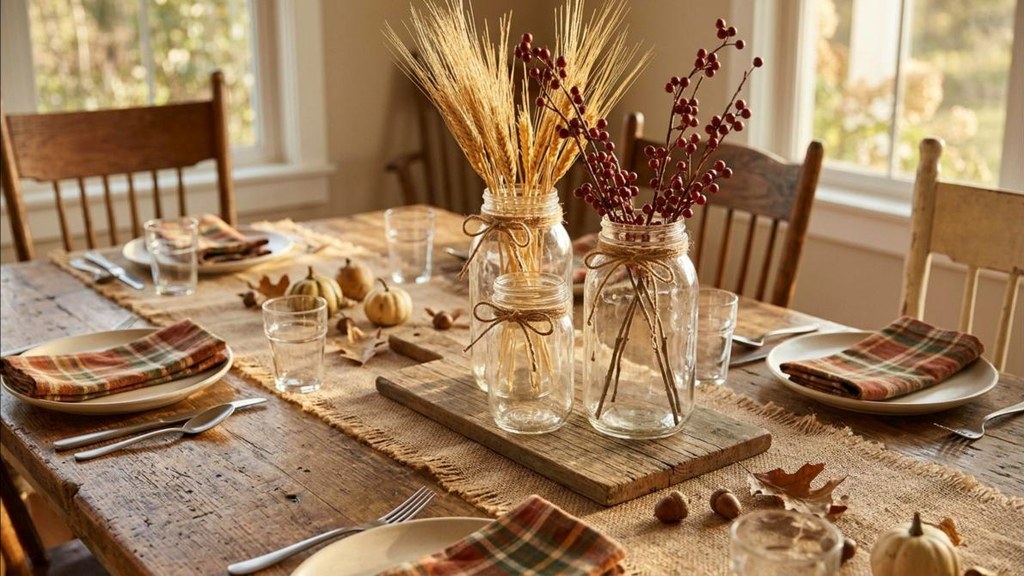
Mason jars are cheap, easy to find, and they always look cozy. Wrap the neck of each jar with jute twine, then fill them with dried wheat and a few berry stems. Set three jars of different heights together in the center of your table, maybe on a small wood board or a folded burlap runner. That is it. This is one of the easiest Thanksgiving centerpieces you can make, and it works for a big dinner or a small table for two. Want more color? Add a stem of orange bittersweet or a few faux leaves. After the holiday, these jars work on a kitchen shelf all through the fall.
You will need: Three mason jars, jute twine, hot glue, dried wheat, berry stems.
How to make it: 1. Wrap twine around each jar neck and glue the end. 2. Fill with wheat. 3. Add berry stems.
Wood Slice Riser Display
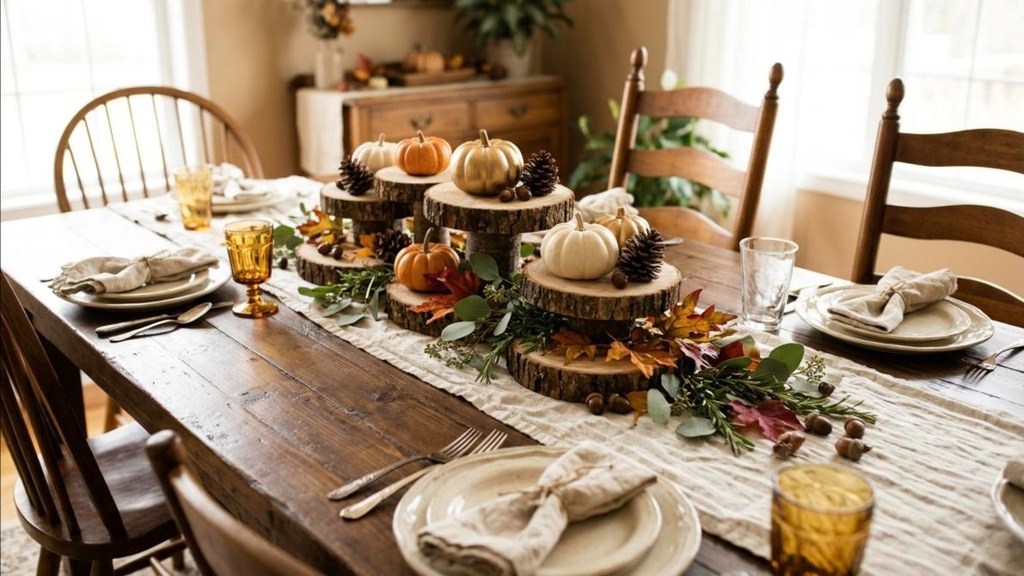
Height is the secret that makes a simple centerpiece look designed. Stack round wood slices from the dollar store into little towers of different heights, glue them together, and set mini pumpkins and pinecones on top. Line them down the middle of the table with some greenery tucked in between. The natural wood feels warm and earthy, and the different levels keep your eye moving. You can spray some of the pumpkins white or gold if you want a more modern look. Thanksgiving centerpieces like this cost about ten dollars, and the wood slices can be reused at Christmas with ornaments instead of pumpkins. Simple, cheap, and really so pretty.
You will need: Wood slices, mini pumpkins, pinecones, hot glue, greenery.
How to make it: 1. Glue slices into stacks of one, two and three. 2. Top each with a pumpkin or pinecone. 3. Add greenery.
Glass Cylinder Harvest Fill
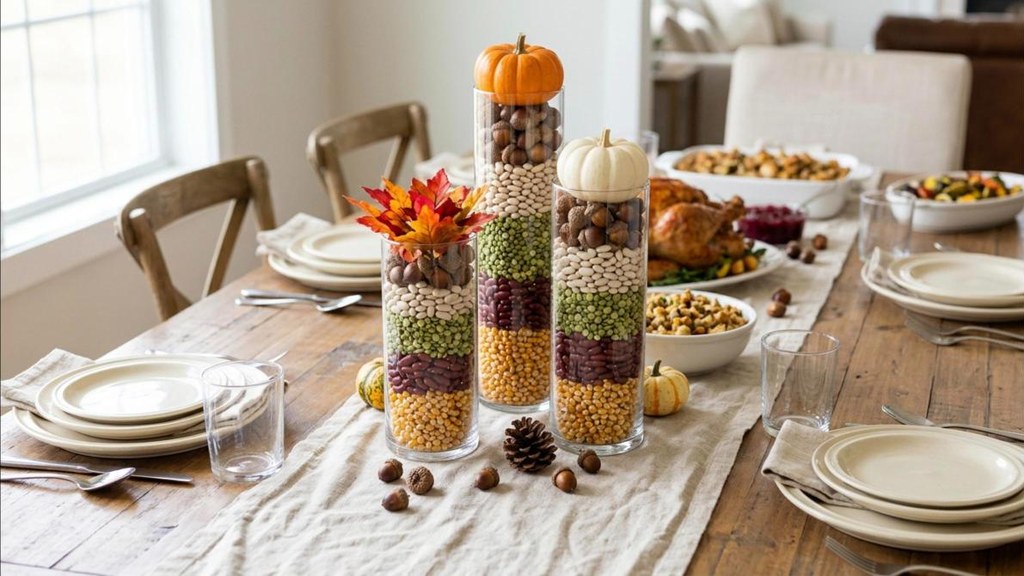
This idea is so simple and looks so smart. Take clear glass cylinders and fill them in layers with dried corn kernels, dried beans, split peas, and acorns. The stripes of color look like a harvest you can see through. Top each one with a faux leaf, a mini pumpkin, or a small sprig of wheat. Group three cylinders of different heights together, or line several down a long table. Everything you need is in the grocery store aisle, and none of it goes bad. When the holiday is over, pour the beans back into a jar and keep the cylinders for next year. Who knew soup ingredients could look so pretty?
You will need: Glass cylinders, dried corn, beans, split peas, acorns, faux leaves.
How to make it: 1. Pour each filler in a neat layer. 2. Tap the glass to level it. 3. Top with a leaf or pumpkin.
Bread Basket Cornucopia
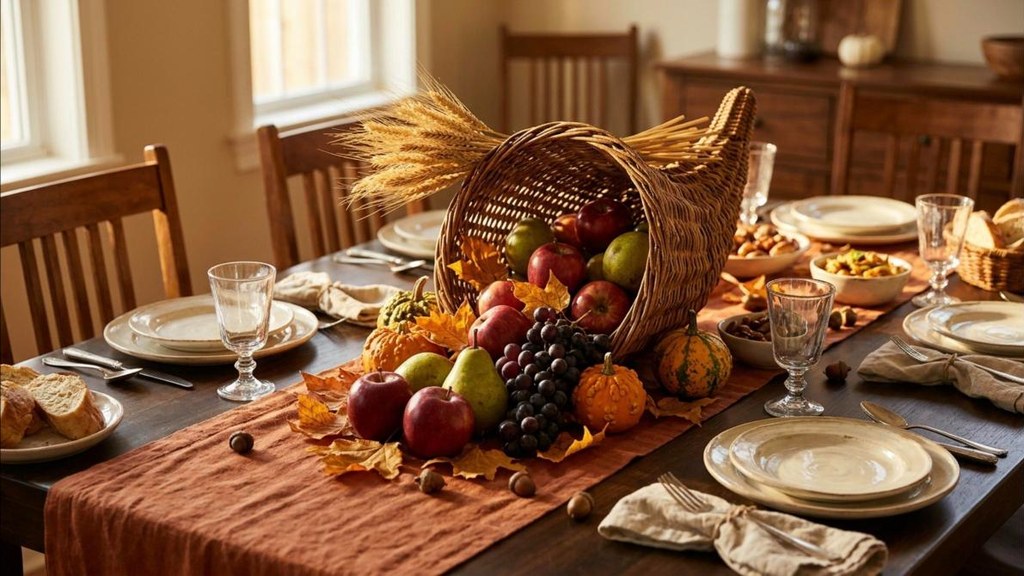
The horn of plenty is a Thanksgiving classic, but you do not need a fancy one. Lay a thrifted wicker basket on its side and let faux apples, pears, grapes, and gourds spill out across the table. Add some fall leaves and a few wheat stems poking out from the back. It feels generous and abundant, which is exactly the mood of the day. Check thrift stores for baskets with a nice shape and a sturdy weave. You can use real fruit too, then eat it later in the week. Kids love helping with this one because there is no wrong way to pile up the fruit. A cloth napkin underneath protects the table from scratches.
You will need: A wicker basket, apples, pears, grapes, gourds, fall leaves.
How to make it: 1. Lay the basket on its side. 2. Pile fruit so it spills out. 3. Tuck in leaves and wheat.
Magnolia Leaf Thanksgiving Centerpieces
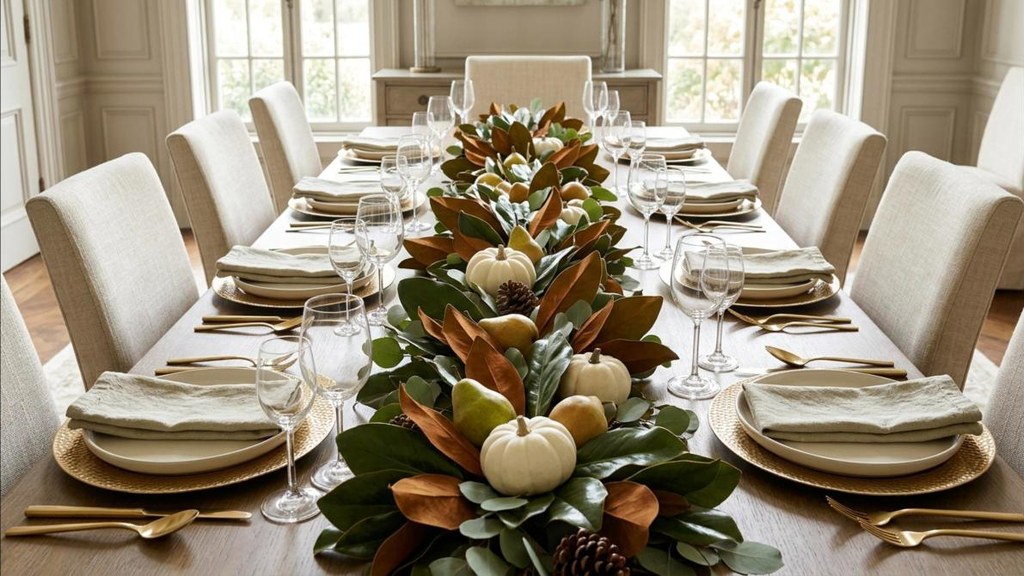
A long garland running down the middle of the table looks rich and elegant, and it is one of the easiest looks to pull off. Lay a faux magnolia garland straight down the center, then tuck in eucalyptus stems to soften it. The glossy green tops and velvety brown undersides of magnolia leaves look gorgeous next to cream plates and gold flatware. Want to add a little more? Place a few small white pumpkins or pears along the garland. Of all the Thanksgiving centerpieces here, this one fits long tables best. It also takes up very little space, so there is plenty of room for the turkey and all those side dishes.
You will need: Faux magnolia garland, eucalyptus stems, small white pumpkins.
How to make it: 1. Lay the garland down the center. 2. Tuck in eucalyptus. 3. Add small pumpkins along it.
Chalk Painted Thrift Store Vases
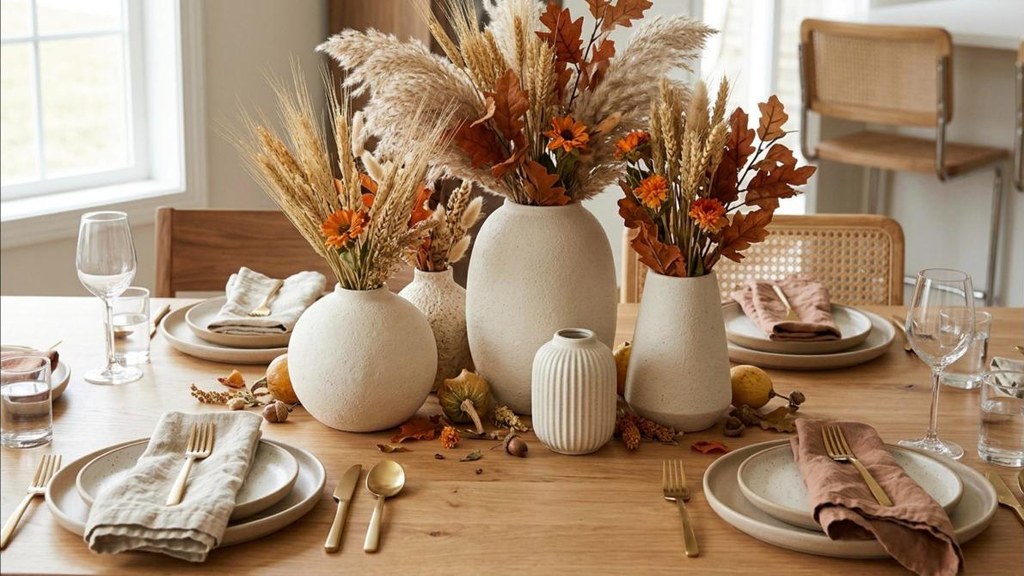
Thrift stores are full of odd glass vases that cost a dollar or less. Paint a whole group of them in one creamy color and they suddenly look like a matching pottery set. Mix a little baking soda into chalk paint or regular acrylic paint for a textured, stoneware look. Let them dry, then fill them with fall stems like wheat, dried grasses, faux leaves, or a few grocery store flowers. Cluster three or five together in the center of the table. Thanksgiving centerpieces made this way look like something from a high end home store. And when the season changes, just change the stems. Odd numbers always look best.
You will need: Thrifted vases, chalk paint, baking soda, a brush, fall stems.
How to make it: 1. Stir baking soda into the paint. 2. Paint two coats and let dry. 3. Fill with stems and group.
Velvet Pumpkin Cluster
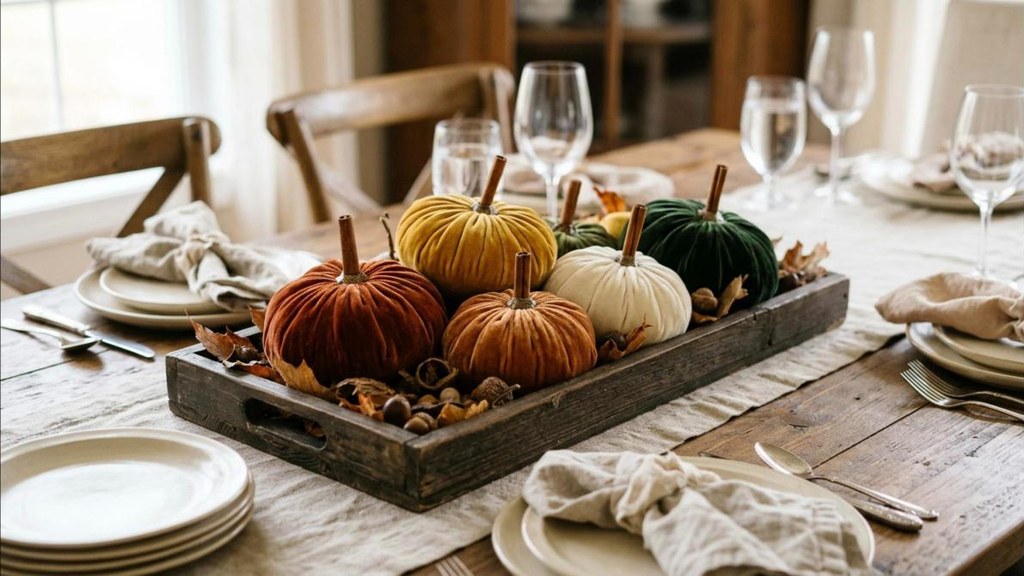
Velvet pumpkins sell for $30 or more each in fancy shops, but you can make a whole patch for a few dollars. Cut a circle of velvet fabric, sew a loose running stitch around the edge, fill it with rice or dried beans, and pull the thread tight. Push a cinnamon stick into the top for a stem. That is it! Make them in rich colors like rust, mustard, cream, and deep green, then group them on a wooden tray in the middle of the table. They feel soft and luxurious, and they last for years. Don’t be surprised if guests want to take one home. Rice filled ones feel nice and heavy.
You will need: Velvet fabric, needle and thread, rice, cinnamon sticks, a tray.
How to make it: 1. Cut a fabric circle. 2. Stitch the edge, fill with rice and pull tight. 3. Glue on a cinnamon stick.
Apple and Pear Tiered Stand
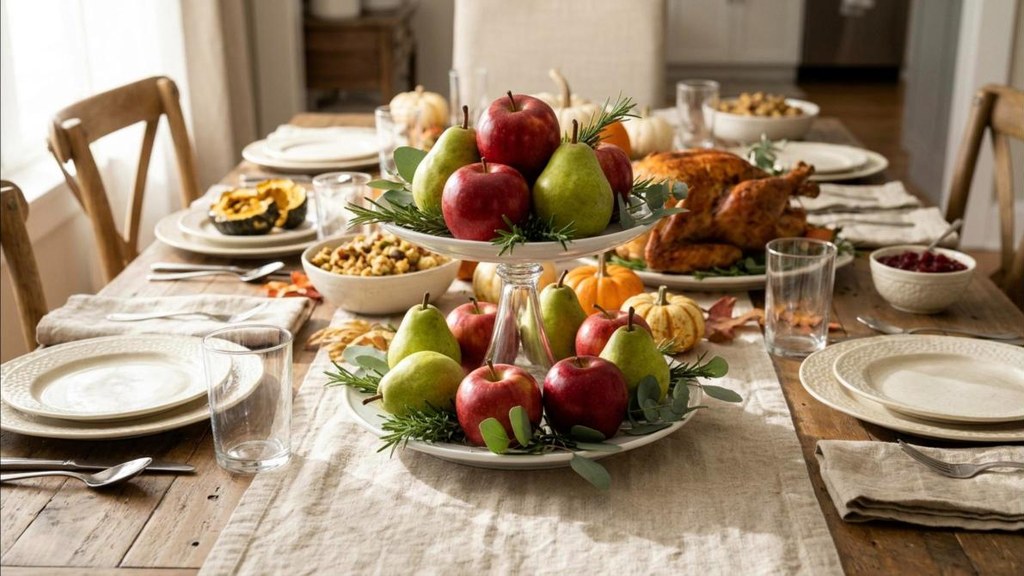
A tiered stand of fresh fruit looks like something you would see at a fancy bakery. You can make one with two dollar store plates and a glass tumbler. Glue the glass upside down to the center of the big plate, then glue the smaller plate on top. Let it cure overnight. Fill it with red apples, green pears, and a few sprigs of rosemary or eucalyptus. It adds height and color to the table, and guests can grab a piece of fruit later. Thanksgiving centerpieces that you can actually eat? That is a win for everyone. Pick fruit with stems and leaves still attached for the prettiest look. Polish the apples with a soft towel so they shine.
You will need: Two plates, a glass tumbler, strong glue, apples, pears, greenery.
How to make it: 1. Glue the glass upside down to the big plate. 2. Glue the small plate on top. 3. Cure overnight, then fill.
Pinecone Turkey Accents
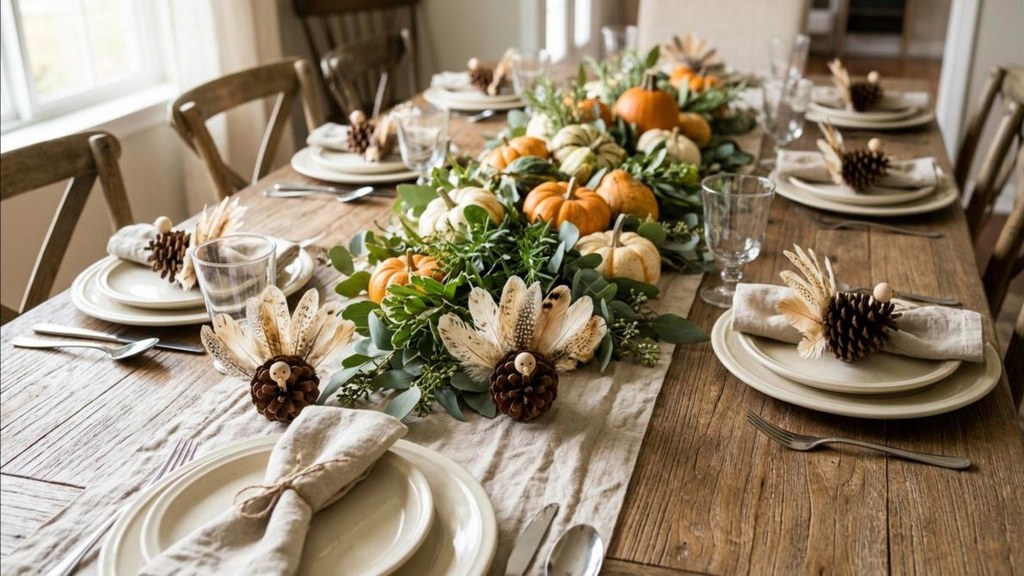
Pinecone turkeys are not just for kids. Made in neutral colors, they look charming and a little bit rustic. Glue a few natural feathers or felt feathers in cream, tan, and brown to the back of a pinecone, then add a small wooden bead for the head. Set them around your main centerpiece or one at each place setting. They make guests smile, and they are a sweet way to tie the whole table together. Gather pinecones on a walk, bake them in the oven at a low heat for an hour to clean them, and you are ready to craft. These cost almost nothing and bring a lot of charm.
You will need: Pinecones, feathers or felt, wood beads, a marker, hot glue.
How to make it: 1. Bake pinecones at 200 degrees for an hour. 2. Glue feathers to the back. 3. Add a bead head.
Lantern Thanksgiving Centerpieces Without Flame
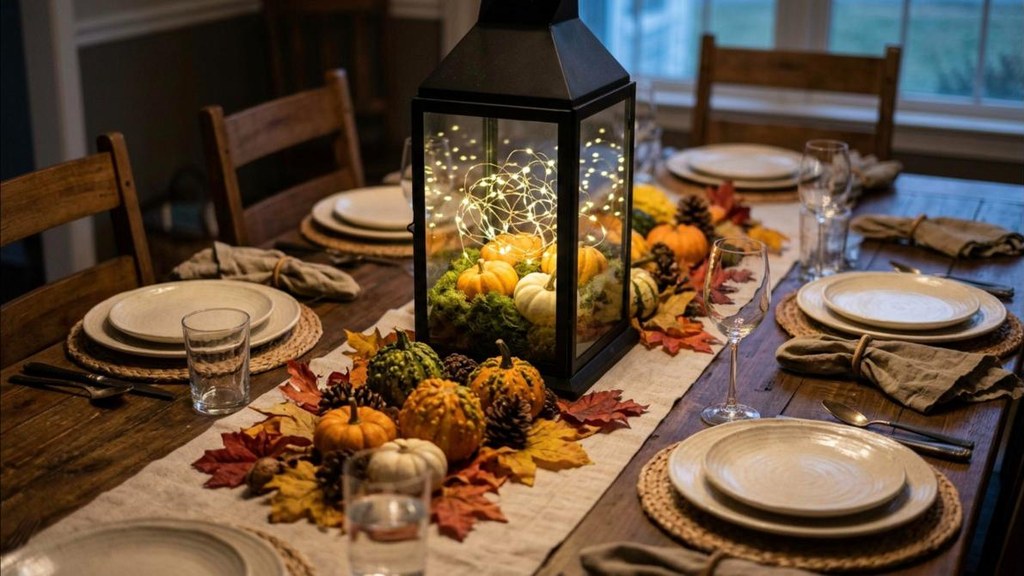
Lanterns add instant charm to a table, and you do not need a flame to make them glow. Fill a thrifted metal or wood lantern with moss and mini pumpkins, then tuck in a strand of battery fairy lights. The tiny lights twinkle between the pumpkins and look magical once the sun goes down. It is also much safer with kids, pets, and busy hands reaching across the table. Set one big lantern in the center, or line up two or three of different sizes. Thrift stores often have lanterns for a few dollars, and a quick coat of spray paint makes them look new again. A little moss covers any gaps.
You will need: A thrifted lantern, moss, mini pumpkins, battery fairy lights.
How to make it: 1. Paint the lantern if needed. 2. Add moss and mini pumpkins. 3. Weave in battery lights.
Gourd and Moss Pedestal
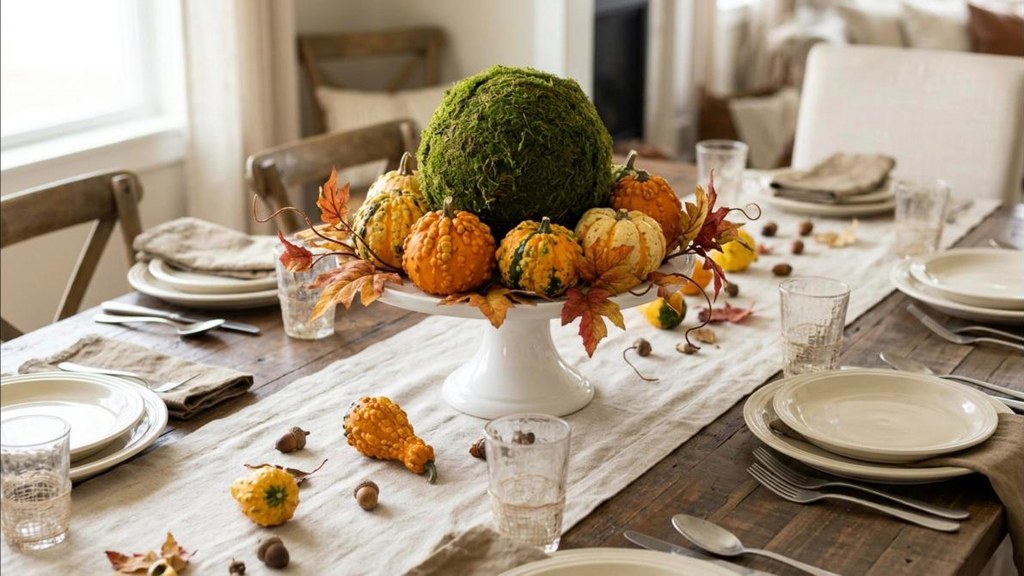
Got a cake stand hiding in a cabinet? Turn it into a centerpiece. Set a moss ball in the middle of the stand and arrange a few colorful gourds around it. Tuck in some wired fall leaves so they curl over the edge. The pedestal lifts everything up so it becomes the star of the table, and it takes about five minutes to put together. White, glass, or wood stands all work. You can find cake stands at thrift stores for a couple of dollars, and dollar stores sell moss balls and gourds every fall. Simple, quick, and very pretty. What more could you ask for? Use a footed stand for the most height.
You will need: A cake stand, a moss ball, small gourds, wired leaves.
How to make it: 1. Set the moss ball on the stand. 2. Arrange gourds around it. 3. Tuck in wired leaves.
Dried Orange and Cinnamon Thanksgiving Centerpieces
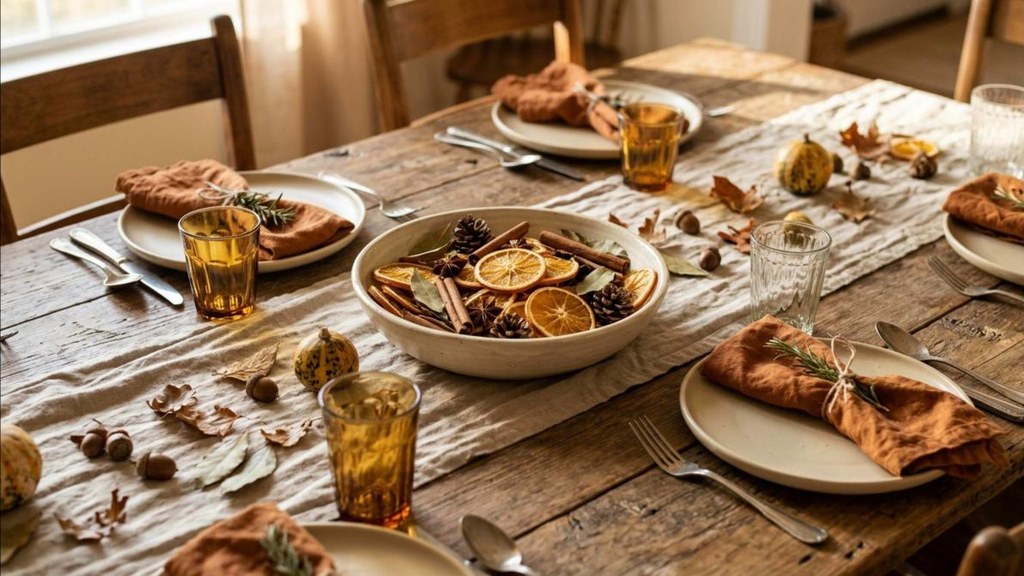
Want your table to smell as good as your kitchen? Fill a shallow bowl with dried orange slices, cinnamon sticks, and star anise. The colors are warm and golden, and the scent is soft and spicy without being too strong. Dry the oranges in the oven a day or two before. You can add a few bay leaves or small pinecones too. This works great as a small centerpiece for a round table or as a side piece on a buffet or kitchen island. It also makes a lovely host gift if you put some in a jar with a ribbon. Easy, cheap, and it smells like the holidays. Keep a small bowl near the door, too.
You will need: Dried orange slices, cinnamon sticks, star anise, a shallow bowl.
How to make it: 1. Dry thin orange slices at 200 degrees for three hours. 2. Fill the bowl. 3. Tuck in spices.
Grateful Tag Branch Centerpiece
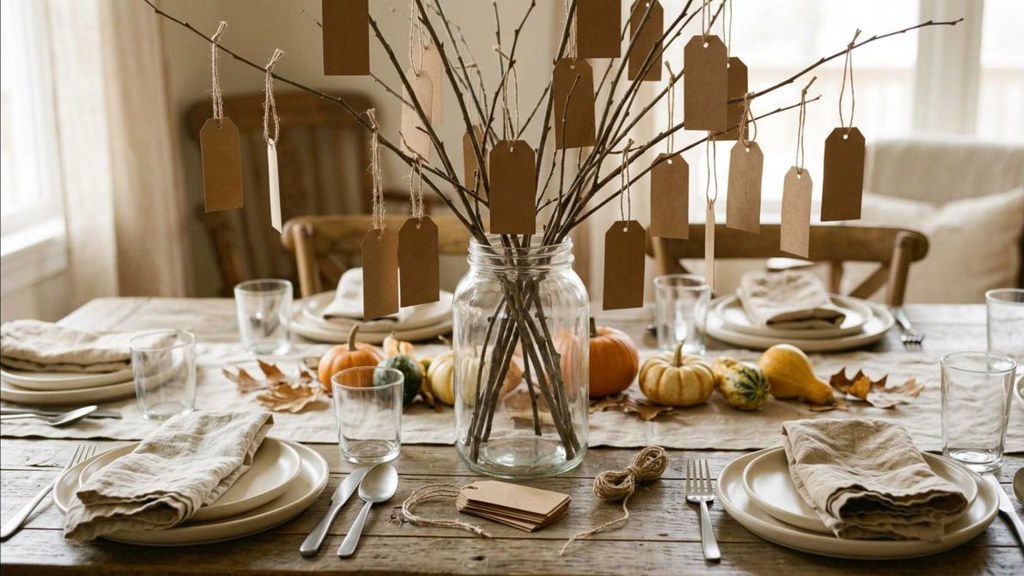
This centerpiece is about more than looks. Set a few bare branches in a big jar or vase and leave a pile of kraft paper tags and a pen nearby. As guests arrive, ask each person to write one thing they are thankful for and tie it to a branch. By dessert, the branches are full of kind words. Read a few out loud before pie. It is a sweet tradition, and it makes great memories. Save the tags in an envelope each year. Thanksgiving centerpieces that bring people together are the ones that matter most, don’t you think? Keep the pen tied to the jar so it does not get lost under the napkins. It works for every age.
You will need: Bare branches, a large jar, kraft tags, twine, a pen.
How to make it: 1. Set branches in the jar with stones. 2. Add twine to each tag. 3. Let guests write and tie them on.
Mini Bud Vase Line
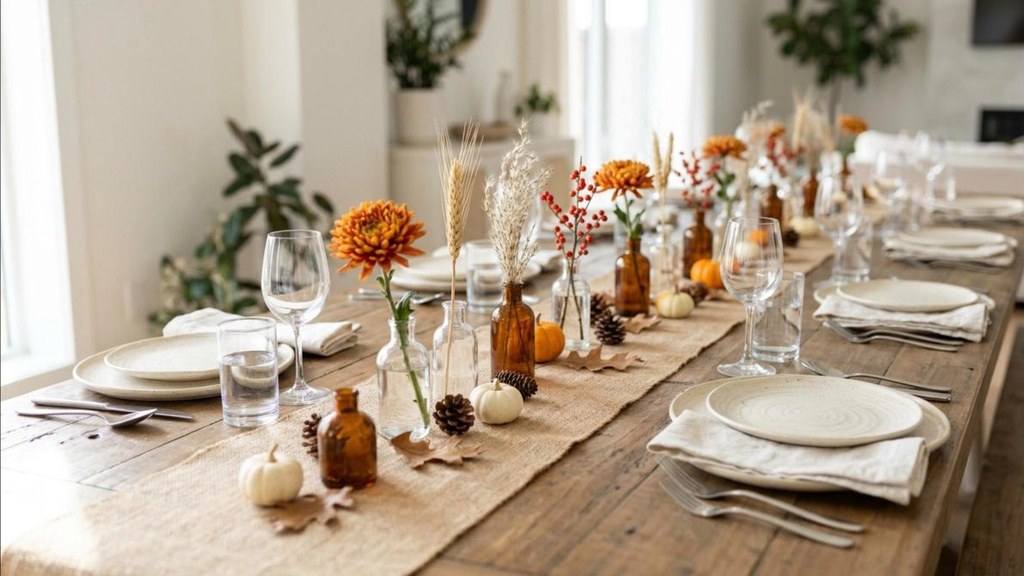
Sometimes less really is more. Line up a row of tiny bud vases down the middle of a burlap runner and put one single stem in each. Use a mix of fall flowers, wheat, dried grass, and berry sprigs so each vase looks a little different. The effect is light, airy, and very modern. It works on long tables and keeps the center open for serving dishes. Dollar stores sell small glass bottles and bud vases in packs, and a single grocery store bouquet can fill them all. It is the perfect choice for anyone who loves a simple, clean look. Thanksgiving centerpieces do not get much easier than this, and it looks beautiful in photos.
You will need: Mini bud vases, a burlap runner, single fall stems.
How to make it: 1. Lay the runner down the table. 2. Space the vases evenly. 3. Add one stem to each.