Christmas Cookie Tin Crafts: 15 Cozy Ways to Turn Grandma’s Old Tins Into Gifts and Decor
Every Christmas cookie tin in Grandma’s cupboard holds a little magic. You remember the sound of that lid popping off, the smell of butter cookies, and the sewing kit that was hiding inside when you hoped for sugar. Now those old tins are piling up in thrift stores, attics and kitchen cabinets, and they cost next to nothing. With a little paint, some ribbon and an evening at the kitchen table, they turn into gifts that look like they came from a fancy boutique. Below are 15 cozy projects for adults who love handmade Christmas, from cocoa kits and ornaments to a wreath your neighbors will ask about. Grab a tin, pour something warm and let’s make something lovely..
A Christmas Cookie Tin Painted Like a Bakery Gift

This is the Christmas cookie tin project that started it all, and it is the easiest one here. Sand off any old print, spray a coat of primer, then paint the tin in a deep red, a soft cream or a pine green. Little white snowflakes and holly leaves done with a fine brush make it look like a bakery box from a Paris shop. Fill it with your own sugar cookies and tie it with jute twine and plaid ribbon. Who on your list needs a box of homemade cheer this year..
You will need: an old round cookie tin, fine sandpaper, spray primer, acrylic or enamel paint in red, cream and green, a fine brush, white paint pen, jute twine, plaid ribbon, parchment paper.
How to make it: 1. Wash the tin, dry it well and sand it lightly. 2. Spray one thin coat of primer outdoors and let it dry. 3. Paint two coats of color, then add snowflakes and holly with the brush or paint pen. 4. Line with parchment, add cookies and tie with twine and ribbon.
Christmas Cookie Tin Hot Cocoa Kit

A hot cocoa kit is the gift that everyone actually uses, and a Christmas cookie tin keeps it all tidy. Tuck in small jars of cocoa mix, a bag of mini marshmallows, a few peppermint sticks and a wooden spoon tied on with twine. Add a mug next to it for a teacher or coworker and the whole thing still costs less than a fancy coffee drink. Want it to look extra special? Write the cocoa recipe on a little kraft card and tuck it under the lid.
You will need: a painted cookie tin, small glass jars, cocoa mix, mini marshmallows, peppermint sticks, a wooden spoon, twine, tissue paper, a kraft card.
How to make it: 1. Line the tin with tissue paper. 2. Fill small jars with cocoa mix and marshmallows and close them well. 3. Nest the jars, peppermint sticks and spoon inside. 4. Tie the lid with twine and add a recipe card.
Tin Lid Christmas Ornaments

Small tins often lose their bottoms long before their lids, so put those pretty lids to work on the tree. Glue vintage style holiday paper, old Christmas cards or a scrap of wrapping paper inside each lid, brush on a coat of Mod Podge and add a little glitter around the rim. A hole punched near the edge with adult help and a loop of ribbon turns each lid into a shiny ornament that catches the tree lights. How many lids are waiting in your junk drawer right now?
You will need: small metal tin lids, old Christmas cards or holiday paper, Mod Podge, a foam brush, fine glitter, ribbon, a hammer and nail for an adult.
How to make it: 1. Trace the lid on your paper and cut the circle. 2. Glue it inside the lid and seal it with Mod Podge. 3. Add glitter to the rim while it is wet. 4. An adult taps a small hole near the edge with a nail; thread ribbon through.
Christmas Cookie Tin Sewing Kit Gift

Ask anyone over forty and they will tell you the same funny story: the Christmas cookie tin at Grandma’s never had cookies inside, only needles and thread. Lean into that memory and make a real sewing kit gift. Glue a small fabric pincushion into the lid, then fill the tin with spools of thread, buttons, a measuring tape and small scissors. It is a perfect gift for a college student, a new homeowner or anyone who always asks to borrow a needle. Who would laugh the hardest when they open it?
You will need: a cookie tin, a scrap of fabric, cotton stuffing, a cardboard circle, hot glue for an adult, thread spools, buttons, a measuring tape, small scissors, safety pins.
How to make it: 1. Cut a cardboard circle a little smaller than the lid. 2. Wrap stuffing and fabric around it to make a cushion. 3. An adult glues it inside the lid. 4. Arrange the sewing supplies neatly in the tin.
Mini Winter Village in a Tin Lid

A large round lid makes the perfect tray for a tiny winter village. Fold little houses from white card stock, set them among bottle brush trees and sprinkle fake snow all around. Weave a small battery fairy light string between the houses and the whole scene glows on a mantel or a side table. Because it sits in a lid, you can lift it and move it without one house falling over. Would you put yours on the mantel or by the front door?
You will need: a large cookie tin lid, white card stock, scissors, glue, small bottle brush trees, fake snow, a small battery fairy light string.
How to make it: 1. Fold and glue little card stock houses. 2. Glue the trees and houses inside the lid. 3. Fill the gaps with fake snow. 4. Tuck the battery light string between the houses and switch it on.
Christmas Cookie Tin Planter With a Mini Tree

Rosemary trees are everywhere in December, and they look twice as sweet in a painted Christmas cookie tin. Paint the tin cream or white, add a few pebbles in the bottom for drainage and set the little pot inside. A tiny red bead garland makes it look like a real Christmas tree. It smells wonderful, lives happily on a sunny windowsill and makes a lovely gift for a neighbor or a host. Who on your street would love a living tree in their kitchen?
You will need: a cookie tin, cream paint, small pebbles, a small potted rosemary tree, a tiny red bead garland.
How to make it: 1. Paint the tin and let it dry. 2. Add a layer of pebbles to the bottom. 3. Set the potted rosemary inside so the plastic pot is hidden. 4. Wrap the bead garland around the little tree.
Decoupage Christmas Cookie Tin With Holiday Napkins
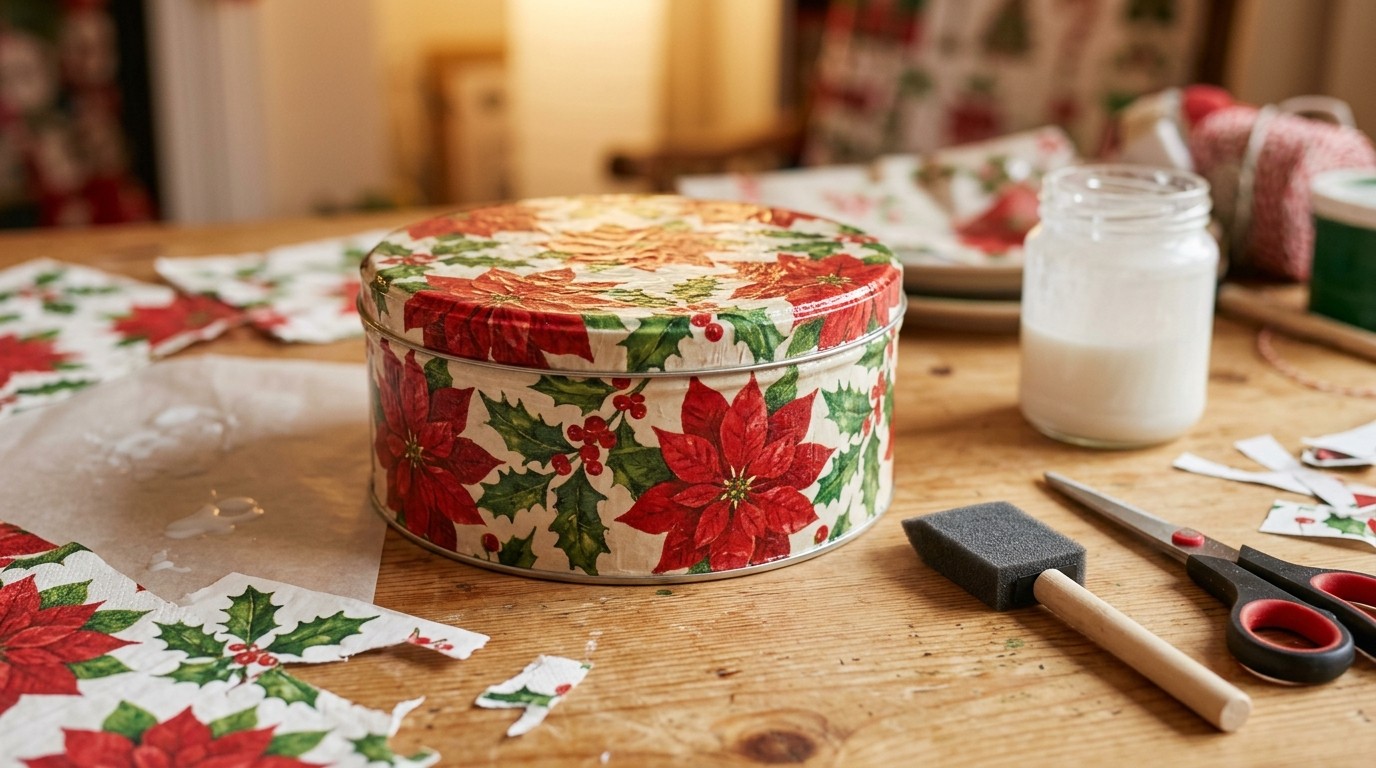
Pretty paper napkins with holly and poinsettias are cheap at any dollar store, and they turn a plain Christmas cookie tin into something that looks hand painted. Peel away the extra plies so you only use the thin printed layer, then smooth it onto a painted tin with Mod Podge. Seal the top with two more coats for a soft glossy finish. If you want to learn more about this old craft, the history of decoupage goes back hundreds of years. Which napkin pattern would you choose?
You will need: a cookie tin, white paint, Christmas paper napkins, Mod Podge Gloss, a soft foam brush, scissors.
How to make it: 1. Paint the tin white and let it dry. 2. Separate the printed napkin layer and tear or cut pieces. 3. Brush Mod Podge on the tin, lay the napkin on top and smooth it gently. 4. Add two more coats over the top and let it dry overnight.
Tin Lid Christmas Wreath

If you have been saving lids, this is your moment. Paint a dozen or more small lids in red, white and green, add little dots and stripes, and glue them in a circle onto a cardboard or wire wreath ring. Tuck faux greenery between them and finish with a big plaid bow. The metal catches the light on a front door and nobody will guess it started as a pile of old tins. Pair it with the ideas in our Tin Can Crafts gallery for a whole porch of upcycled charm. Ready to start saving lids?
You will need: 12 to 18 small metal lids, acrylic paint, a wreath ring, faux greenery, hot glue for an adult, a wide plaid ribbon.
How to make it: 1. Paint the lids and add simple dots or stripes. 2. An adult glues the lids around the ring, overlapping a little. 3. Tuck greenery between the lids. 4. Tie a big bow at the bottom and hang it with ribbon.
Christmas Cookie Tin Gift Card Holder

Gift cards are handy, but handing one over in a plain envelope feels a bit flat. Slip it into a small Christmas cookie tin lined with red tissue paper, add a paper star and a bow of twine, and suddenly it feels like a real present. Tiny mint and candy tins are perfect for this. It is the best way to wrap a gift for teens, a mail carrier or anyone who is hard to shop for. Who would smile at a little tin with a surprise inside?
You will need: a small cookie or mint tin, red tissue paper, a paper star or tag, jute twine, a gift card.
How to make it: 1. Paint or decorate the small tin if you like. 2. Line it with tissue paper. 3. Tuck in the gift card and a paper star. 4. Close the lid and tie it with twine.
Stacked Tin Snowman
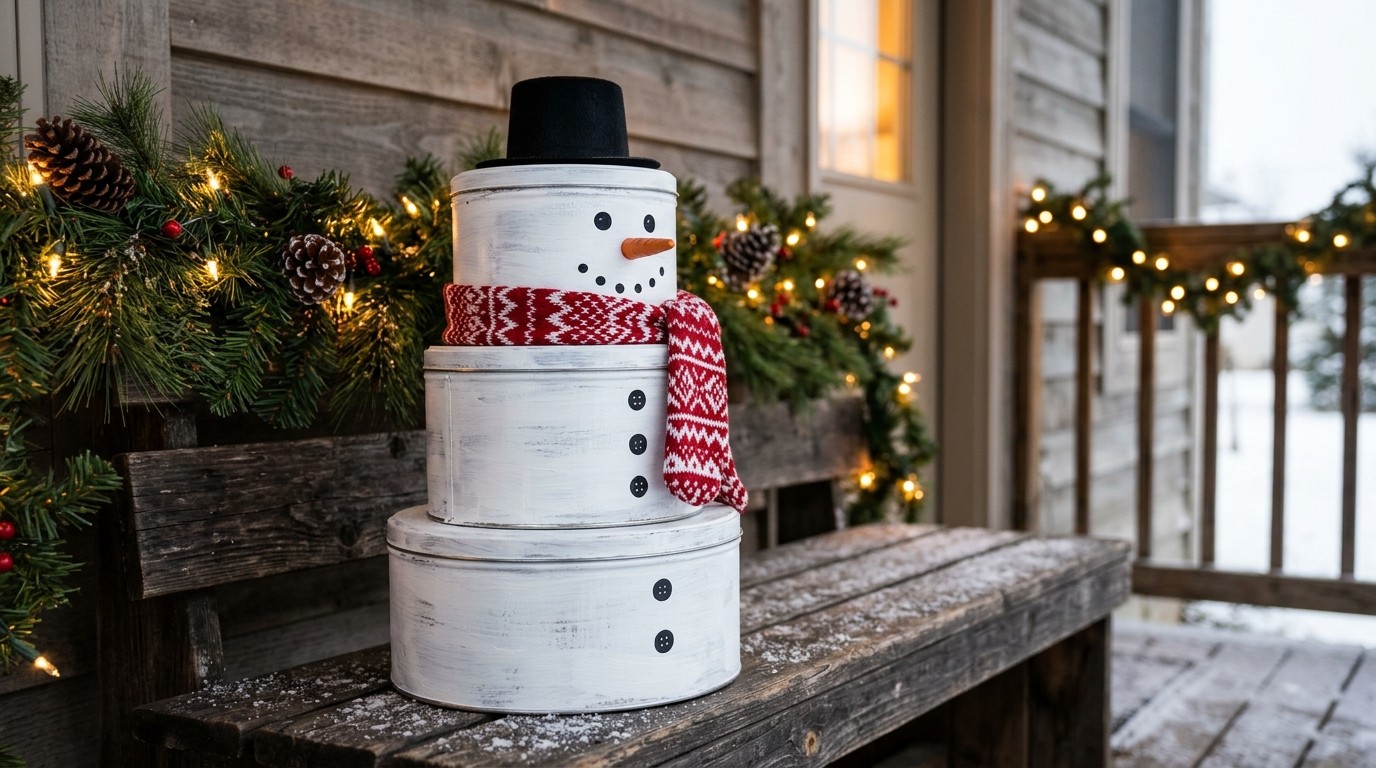
Three tins of different sizes stacked up make the cutest snowman you have ever seen. Paint them white, add button eyes and a painted smile, and give him a wooden carrot nose. A little knit scarf and a tiny black hat finish the look. Bonus: each tin still opens, so the snowman can hide cookies, ornaments or gift wrap supplies. He looks right at home on a porch bench or beside the front door. What would you name your snowman?
You will need: three round tins in small, medium and large sizes, white paint, black paint, a small wooden carrot or orange clay, a sock or knit scarf, a mini black hat, strong glue.
How to make it: 1. Paint all three tins white and let them dry. 2. Paint eyes, a smile and buttons. 3. Glue the carrot nose on the top tin. 4. Stack the tins, add the scarf and hat, and glue the hat in place.
Christmas Cookie Tin Candy Station

A row of open tins filled with peppermints, gumdrops, chocolate and candy canes makes a cheerful candy station for a party or a family movie night. Paint each Christmas cookie tin a different holiday color, set them on a cake stand or wooden board at different heights and add little scoops. Guests help themselves and the table looks like a candy shop. What candy would fill your favorite tin?
You will need: four to six cookie tins, holiday paint colors, a wooden board or cake stand, small scoops or spoons, wrapped candies, kraft tags.
How to make it: 1. Paint each tin a different color. 2. Arrange them on a board or stand at different heights. 3. Fill each with one kind of candy. 4. Add scoops and small kraft tags with the candy names.
Tin Photo Memory Box

Old family photos often live in shoe boxes, but a sturdy tin keeps them safe and looks much prettier. Glue a favorite photo copy to the lid and seal it with Mod Podge, then fill the tin with prints, handwritten recipe cards and little notes from Christmas past. It is a heartfelt gift for parents or grandparents and a lovely thing to open together on Christmas Eve. Which old photo would you put on the lid?
You will need: a large tin, a printed copy of a favorite photo, Mod Podge, a foam brush, ribbon, family photo prints, index cards.
How to make it: 1. Print a copy of a photo sized for the lid. 2. Glue it on with Mod Podge and seal the top. 3. Tie a ribbon around the tin. 4. Fill it with photos, recipe cards and notes.
Fabric Covered Christmas Cookie Tin
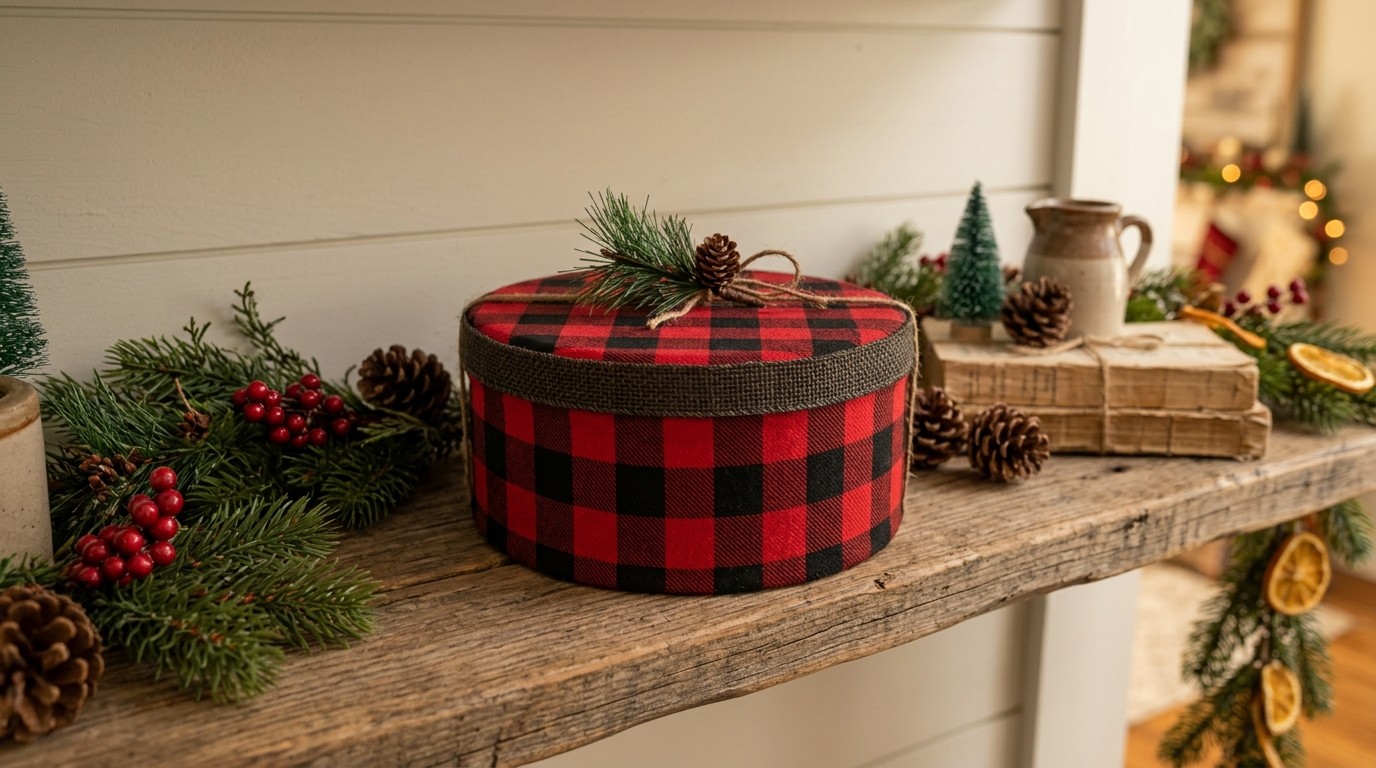
Not a painter? Wrap your Christmas cookie tin in fabric instead. A fat quarter of red plaid, buffalo check or tiny holiday print is all you need. Brush Mod Podge onto the tin, smooth the fabric on, fold the edges inside and finish the rim with ribbon trim. It looks like a cozy farmhouse storage box and works for gift wrap, ornaments or a batch of fudge. Which fabric would you pick from your scrap bin?
You will need: a cookie tin, a fat quarter of holiday fabric, Mod Podge, a foam brush, scissors, ribbon trim.
How to make it: 1. Cut fabric to wrap around the tin with a little extra. 2. Brush Mod Podge on the tin and smooth the fabric on. 3. Fold the edges inside and glue them. 4. Cover the lid the same way and glue ribbon around the rim.
Chalkboard Tin Lid Gift Tags

Here is a gift tag that gets used again and again. Paint small lids with chalkboard paint, tie them to presents with twine and write each name in chalk. After Christmas, wipe them clean and save them for next year, or hang them on the tree as rustic ornaments. They look great on brown kraft paper wrapping. Would your family keep them as a new tradition?
You will need: small metal lids, chalkboard paint, a small brush, a hammer and nail for an adult, jute twine, chalk or a chalk marker.
How to make it: 1. Paint the lids with two coats of chalkboard paint. 2. An adult taps a small hole near the edge. 3. Thread twine through the hole. 4. Write the name in chalk and tie the tag to the gift.
Striped Thrift Store Tin for a Cookie Swap

The secret to every project in this list is a good stash of tins, and thrift stores sell them for a dollar or two. Look for round ones with tight lids and no rust. A simple striped tin like this one needs nothing more than a wash, a parchment liner and a pile of butter cookies to become the star of a cookie swap. Set it out with a few ornaments and it looks like a gift from a fancy bakery. How many tins could you find on your next thrift run?
You will need: a thrifted round tin, warm soapy water, a soft cloth, parchment paper, homemade butter cookies, a ribbon.
How to make it: 1. Wash the tin in warm soapy water and dry it right away. 2. Check the lid fits tightly. 3. Line it with a circle of parchment. 4. Stack in the cookies and tie on a ribbon for the swap.